4. Seedling Nurseries
It is certainly easier for farmers to plant seedlings directly rather than sowing seed, however designing, building and managing seedling nurseries should only be taken on by more experienced growers. The seedling system has a great advantage in that at the early stages of sensitive vegetables, you only need to manage a small area, instead of a whole field of tiny emerging plants. Once the seedlings reach 7-10cm the best of these seedlings can be transplanted and you don’t have the difficulty of gapping and unhomogenous stands.
Seedling nurseries can be in the ground on raised beds or else in seedling trays. Good drainage is crucial either way. The seedling nursery site should be in a secure area and close to a water source. Shade is very important in the early establishment phase of the vegetable seedlings. This shade can be from shade netting, palm leaves, thatch grass, bamboo or sticks. The structure should preferably be high enough for the person who will water and manage the beds to be able to have easy access, and about 2m above the ground level. Take into account the sun’s movement and design the shade canopy or roof appropriately. It should be wider than the nursery beds, to ensure that there is sufficient shade provided throughout most of the day.
Seedling mixtures are very important for healthy stable plants.
Make a mixture of 1/3rd soil, 1/3rd coarse sand and 1/3rd well sieved, fine compost.
Seedling Nursery Beds
Make a raised bed 100cm wide on top, 15cm high and as long as you need according to seedling numbers required (see chapter 2.4). Place 5cm of the seedling mixture on top of the “fractured” raised seedling bed. Wet the mixture thoroughly. Press the moist seedling soil mixture down firmly with a flat, wooden plank. Then use the narrow edge of the plank to depress a 1cm deep furrow across the bed, repeating every 10cm. Space the seeds 5cm or a matchbox length apart in each row, to allow for safe root extraction. After planting, cover level with the fine seedling mixture, but don’t firm up afterwards in order to allow for easy germination.
Seedling Trays
Seedling trays are the most effective technique to get good quality seedlings out, with little wastage of labour and water, whilst also ensuring excellent root mass and structural integrity. An alternative to seedling trays is to use old egg trays or homemade paper rolls. Before using the trays, soak them in a strong bleach solution of 1 part bleach to 10 parts water to ensure they have no pests or diseases. Fill up the seedling trays with seedling mix, then press each plug down to 1cm deep in readiness for planting, and wet thoroughly. In most cases, plant just 1 seed per plug, then fill the remaining 1cm with the remaining moist, seedling mixture, and scrape off any extra material. Don’t press or firm up after planting, allowing for easy germination.
Write the crop, variety and sowing date on ice-cream sticks or plastic strips so you know what plants you have where.
Watering
The high compost ratio in the seedling mixture will hold a lot of moisture and the extra shade protection will prevent the seedlings from encountering moisture stress. Watering lightly once a day with a watering can with a very fine nozzle will usually be sufficient, but in very hot conditions it may be necessary to water twice a day. Be careful not to over water as this can cause bacterial wilt and mislead the grower to apply more water. Observe your plants and feel soil mixture regularly to assess the moisture status and make the necessary adjustments.
Transplanting
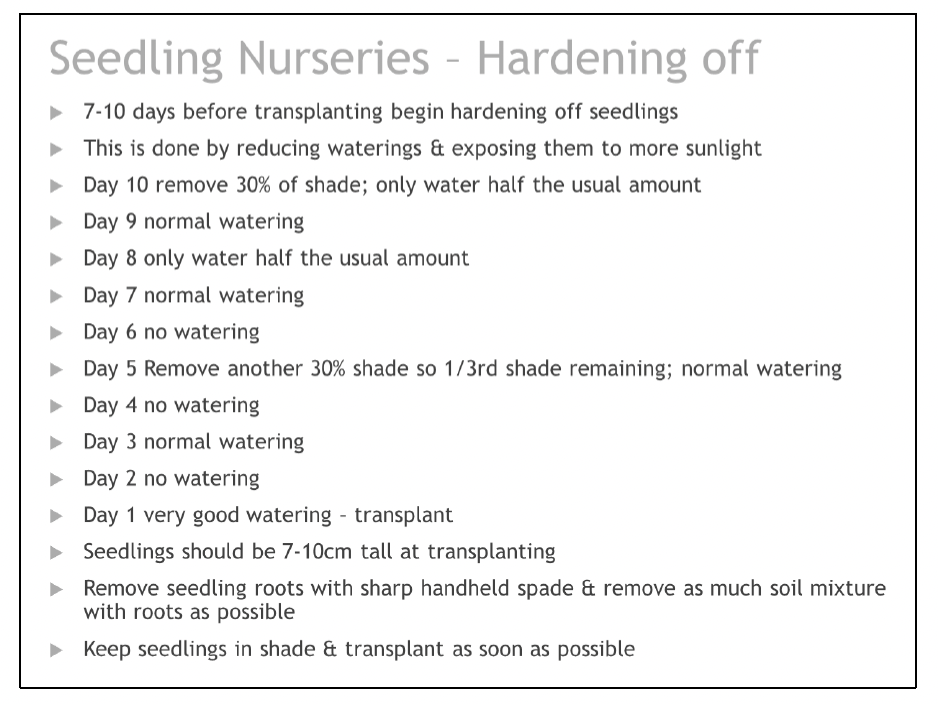
10 days prior to transplanting, begin to harden off the seedlings by exposing them to more and more sunlight and decreasing their watering. This is easy to do when using shade roofing like palm branch leaves, bamboo or thatch grass, as you can gradually remove more and more roof material, hereby allowing more and more light penetration.
Halve the watering on alternate days initially, then restrict watering by skipping a whole day every second day. However, ensure that several hours prior to transplanting that the seedlings receive plenty of water and are thoroughly turgid.
When removing seedlings from seedling beds ensure you have a good, sharp, handheld spade to remove sufficient root with seedling mixture intact. Seedlings should be kept in the shade until planting out which should take place as soon as possible into the well prepared vegetable beds.
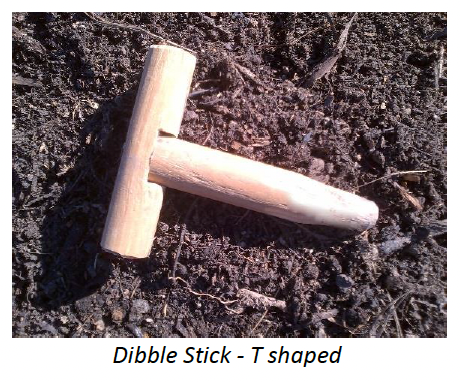
An essential tool for transplanting is the dibble stick, which is a rounded stick used to make a small hole in the ground into which you will plant your seedlings. The dibble stick should be pointed on the end and slightly wider than that of your seedlings, but can be made with many shaped handles such as straight, T shaped or bent. With larger scale plantings a waist high dibble stick with a depth gauge is advantageous. Home vegetable gardeners can simply use a 20-25cm straight, wooden dibble stick made out of a broom handle with some grooves in the handle side to prevent it from slipping.
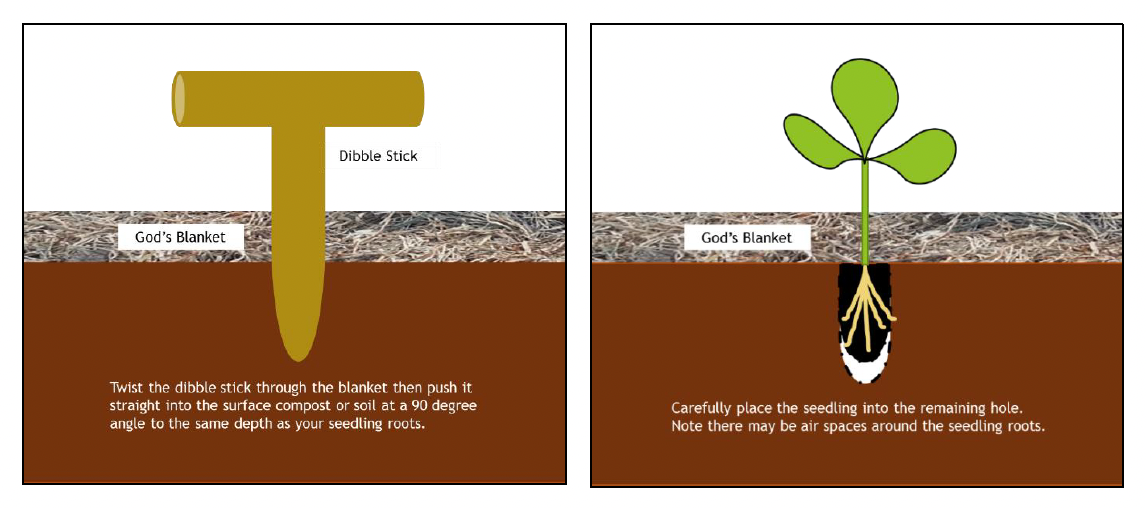
First twist the dibble stick through the blanket, to make sure you don’t push the blanket into the hole. Then press the dibble stick into the soil to make a hole to the required depth. When transplanting seedlings, take care to ensure there are no airspaces left under the roots of the seedling plug which can cause retarded growth and even die back.
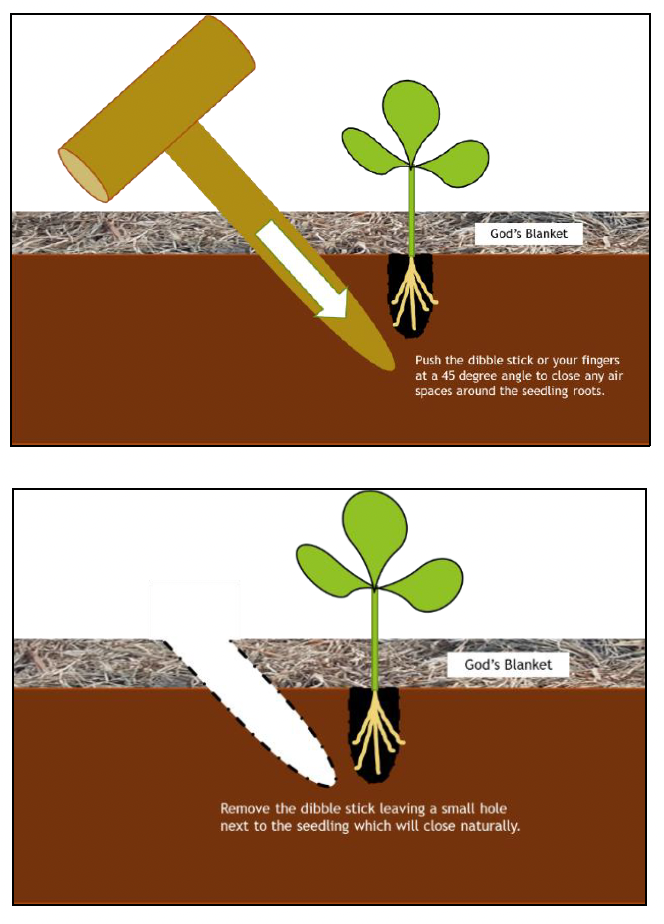
Insert the seedling to the right level and then press the dibble stick in again at a 45° angle, close to the seedling, pushing the soil gently against the seedling roots. This allows the seedling to be well set and ensures that there are no airspaces around the root zone.
The small dibble stick hole left in the compost near the seedling can be covered by foot or hand or left to fill naturally.