6. Fruit, Leaf and Root Vegetable Guidelines
A) Kale/Rape/Collard Greens - Surface Composting Technique
This leafy vegetable is popular in Africa and many variants occur from more traditional Kale to Sukuma wiki in Kenya. They are all from the Brassica oleracea family and although similar to cabbage, they are much easier to grow. They are similar to spinach in that they also produce leaves which can be harvested for long periods of time. In Rape’s instance the plant just continues to grow taller and taller. The leaves are very high in Vitamin C as well as Vitamin K and anti-oxidants.
Kale has an optimal growing temperature from 7-24°C and should be planted in spring and again in autumn, as it does not handle extremely high temperatures at seedling stage.
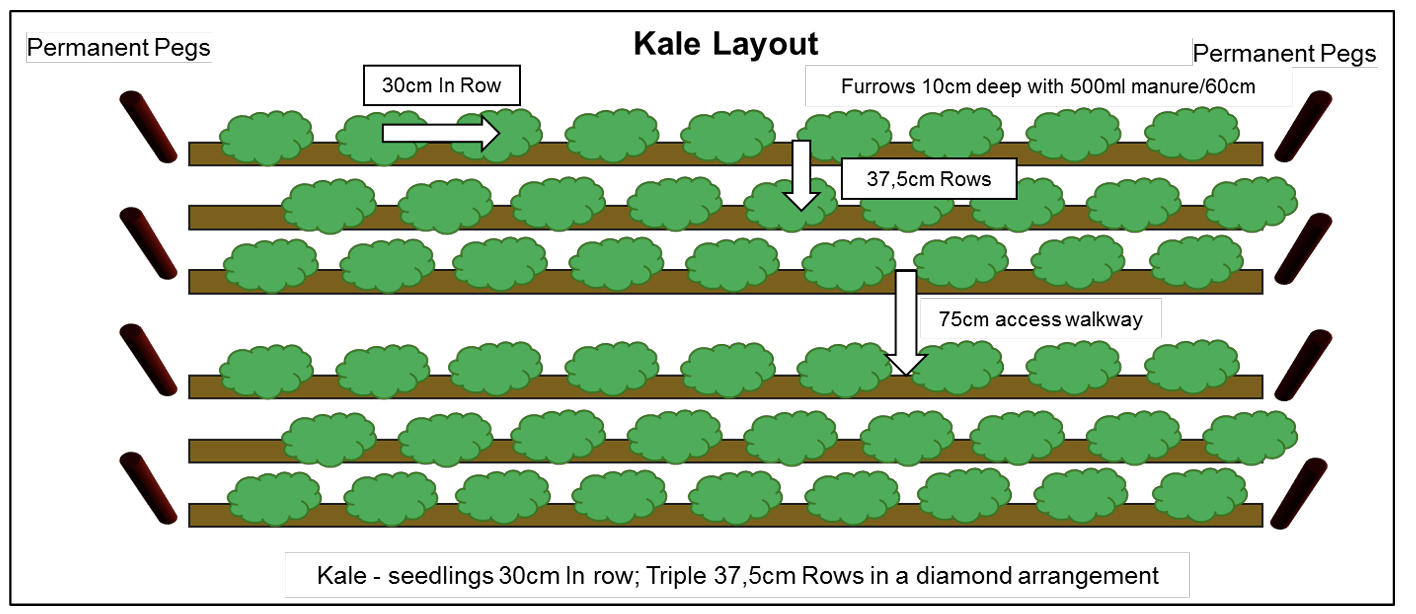
Layout - 37.5cm Triple Rows
Final plant spacing is 30cm between plants in triple 37.5cm rows. Split the 75cm row in half, planting at 0; 37.5 and 75cm, then start again on the next 75cm permanent peg to allow for access for easy harvesting of the leaves. If you have a small home garden then use the 37.5cm spacing throughout to make best use of your space.
Lay Strings for Planting Band
Place a top string or measuring rope from one 75cm permanent peg to its adjoining peg on the opposite side. Next place temporary pegs 10cm down from the permanent pegs and place another string there to establish the surface composting band. Make sure both the ropes are taut and straight by lifting and dropping them.
Remove God’s Blanket
Move God’s Blanket downslope of the 10cm planting band, to ensure none of it gets buried. If you bury the blanket which has not yet decomposed, it can cause the soil to go through a negative nitrogen period and reduce crop yield.
Soil Fracturing
Push the fork 30cm deep and pull it backwards a little until you see the soil loosen or fracture. Remove any stones or rocks that you feel with the fork, but don’t be tempted to lift or turn the soil, you should be merely fracturing it. Keep on repeating this every 10cm along the row line.
Correcting Acidic Soils
To correct acidic soils and allow for readily available plant nutrients evenly sprinkle 1 tablespoon of woodash/bonemeal or 1 teaspoon of lime, every 60cm on the planting line.
Surface Composting
Place compost on top of the 10cm wide band, 5cm deep evenly across the line. It is not necessary to work the compost into the soil. Repeat this process again for each 37.5cm row which will allow your Kale to establish a good canopy closure, but remember to leave an access walkway after every triple row to allow for easy harvesting of the leaves.
Kale is a medium feeder, but it will be in the ground for up to 6 months so is essential to feed it well from the start. This system of surface composting is following exactly what the Lord of all Creation has shown us since the beginning of all time, where He designed for plants to feed from the top.
Furrowing and Planting Seed
In the middle of the compost band, press down with a hoe edge to establish an accurate and even 2cm planting furrow. Plant the Kale seeds 2cm deep and at 15cm apart. Cover the seeds by pinching the compost closed and gently firming up the compost. Thin down to 30cm intervals after germination.
Don’t put the blanket on top of the band until after germination has taken place whereafter the blanket can be brought up against the plant bases. Ensure the blanket is at 100% cover and 2.5cm thick to suppress weed growth and conserve moisture.
Planting Seedlings
It is always better to plant Kale seedlings into the garden compared to seeds. Place the blanket on top of the surface compost before planting, then use a dibble stick with a depth marker on it, twisting it through the blanket and pressing it into the centre of the 10cm wide surface compost band, to the required depth at 30cm intervals. Plant the second or middle line of seedlings in a diamond arrangement for best use of space.
You must ensure the seedling roots are not bent into a J shape which will adversely affect the plants growth, so make sure the dibble stick hole depth is sufficient but not too deep either. If the hole is too deep, it will cause there to be an air space under the roots which is also not desirable. To ensure you don’t have that, hold the seedling in place and press with the dibble stick or your fingers at an angle, pressing the compost gently around the seedling roots. This ensures the seedling roots have no bend and ensures that there are no airspaces around the root zone.
Harvest
When harvesting, break off the two lowest leaves, allowing the inner leaves to fill out. The plants will continue to produce leaves for a long period of time. Also remove any older or diseased leaves to encourage new leaf growth and plant health. We have had 6-8 harvests from our Kale crops in our 6 monthly rotations at the model Farming God's Way garden.


B) Kale/Rape/Collard Greens - Manure/Low Volume Compost Technique
This leafy vegetable is popular in Africa and variants thereof occur from more traditional Kale to Sukuma wiki in Kenya. They are all from the Brassica oleracea family and although similar to cabbage, they are much easier to grow. They are similar to spinach in that they also produce leaves which can be harvested for long periods of time. In Rape’s instance the plant just continues to grow taller and taller. The leaves are very high in Vitamin C as well as Vitamin K and anti-oxidants.
Kale has an optimal growing temperature from 7-24°C and should preferably be planted in spring and again in autumn, as it does not handle extremely high temperatures at seedling stage.
Layout - 37.5cm Triple Rows
Final plant spacing is 30cm between plants in triple 37.5cm rows. Split the 75cm row in half, planting at 0; 37.5 and 75cm, then start again on the next 75cm permanent peg to allow for access for easy harvesting of the leaves. If you have a small home garden then use the 37.5cm spacing throughout to make best use of your space.
Placing String
Place a top string or measuring rope from one 75cm permanent peg to its adjoining 75cm permanent peg on the opposite side. Make sure the rope is taut and straight by lifting and dropping it.
Remove God’s Blanket
Move God’s Blanket 20cm downslope from the planting string to expose the soil. Don’t move it too far as it will interfere with the next 37.5cm row.
Soil Fracturing
Push the fork 30cm deep and pull it backwards a little, until you see the soil loosen or fracture. Remove any stones or rocks that you feel with the fork, but don’t be tempted to lift or turn the soil, you should be merely fracturing it. Keep on repeating this every 10cm along the row line.
Digging Furrows
Dig a furrow 10cm deep, moving the soil downslope of the planting string, taking care to neatly heap the soil for reuse later. Repeat this process again every 37.5cm which will allow your Kale to establish a good canopy closure but leave an access walkway after every triple row to allow for easy harvesting.
Correcting Acidic Soils
To correct acidic soils and allow for readily available plant nutrients evenly sprinkle 1 tablespoon of woodash/bonemeal or 1 teaspoon of lime, every 60cm on the planting line.
Manure/Compost
Evenly spread 500ml of manure/compost every 60cm or shoulder width into the furrow. Although Kale is a medium feeder they are in the ground for at least 6 months and so it is best to feed them well from the beginning.
Seed Depth and Soil Separation Layer
Take a skimming of soil from the downslope heap and cover the inputs with at least 3cm of soil to establish an accurate final planting depth of 2cm deep and also to ensure a good separation layer between the Kale seed and manure. If you don’t separate seed from manure you will get poor germination because of seed burn. This is obviously not the case with high quality compost.
Planting Seed
Plant Kale seeds at 15cm intervals or hand width apart, 2cm deep and cover with fine loose soil, ensuring an even surface for good germination. Thin down to 30cm intervals after germination.
Leave the blanket off until after germination has taken place and then you can bring the blanket up close to the plant stems. Ensure the blanket is at 100% cover and 2.5cm thick to suppress weed growth and conserve moisture.
Planting Seedlings
It is always better to plant Kale seedlings into the garden compared to seeds. Cover all the inputs in the furrow with soil from the downslope heap until the soil surface is level again. Place the 2.5cm thick blanket on top of the surface compost then use a dibble stick with a depth marker on it, twisting it through the blanket and pressing it into the centre of the prepared furrow to the required depth, every 30cm. Plant the second or middle line of seedlings in a diamond arrangement for best use of space.
You must ensure the seedling roots are not bent into a J shape which will adversely affect the plants growth, so make sure the dibble stick hole depth is sufficient but not too deep either. If the hole is too deep, it will cause there to be an air space under the roots which is also not desirable. To ensure you don’t have that, hold the Kale seedling in place and press with the dibble stick or your fingers at an angle, pressing the soil gently around the seedling roots. This ensures the seedling roots have no bend and ensures that there are no airspaces around the root zone.
Harvest
When harvesting, break off the two lowest leaves, allowing the inner leaves to fill out. The plants will continue to produce leaves for a long period of time. Also remove any older or diseased leaves to encourage new leaf growth and plant health. We have had 6-8 harvests from our Kale crops in our 6 monthly rotations at the model Farming God's Way garden.