2. Vegetable Garden Layouts and Land Preparation
Great variations of vegetable production techniques exist from double digging, circle gardens, bag gardens, lasagne gardening, raised composting beds, deep ploughing, rotavating, incorporating inputs, etc. Some work well, others are not viable on large tracts of land, some are ecological disasters, whilst others are just not ever going to catch on due to the effort required.
So can we do Farming God’s Way with vegetables?
Vegetables are not as forgiving as field crops because they have:
a. short growing seasons,
b. weak, shallow root systems and
c. very high nutrient demands!!!
To meet these demands we need to have a stable and fertile starting point, with well structured, crumbly soil, which is mostly not the case at establishment year. Farmers or vegetable gardeners are not very patient and want to start planting as soon as possible. Most farmers also want to start with the more difficult vegetables which can result in a negative experience. Be wary and selective of what you try early on with vegetables.
2.1. Clearing, Levelling and Smother Mulching
Clear the garden of shrubs, weeds and creeping grasses, by uprooting and removing them out of the garden area. Level off the garden as best you can by lowering the high points and filling in hollows, and although you might be disturbing soil, it will be the last time you do so.
Preferably, if you have enough time, you can smother mulch the creeping grasses with at least 10cm of God’s blanket/mulch for 2 months before land preparation begins, to kill off all creeping grasses. See the later chapter on God’s Blanket.
Measure off the size land you will be starting off with and fence it in, keeping in mind that it is better to start small and increase your area as you gain more experience. Ensure that the site is secure, shade free and has easy access to water.
2.2. Making Measuring Ropes
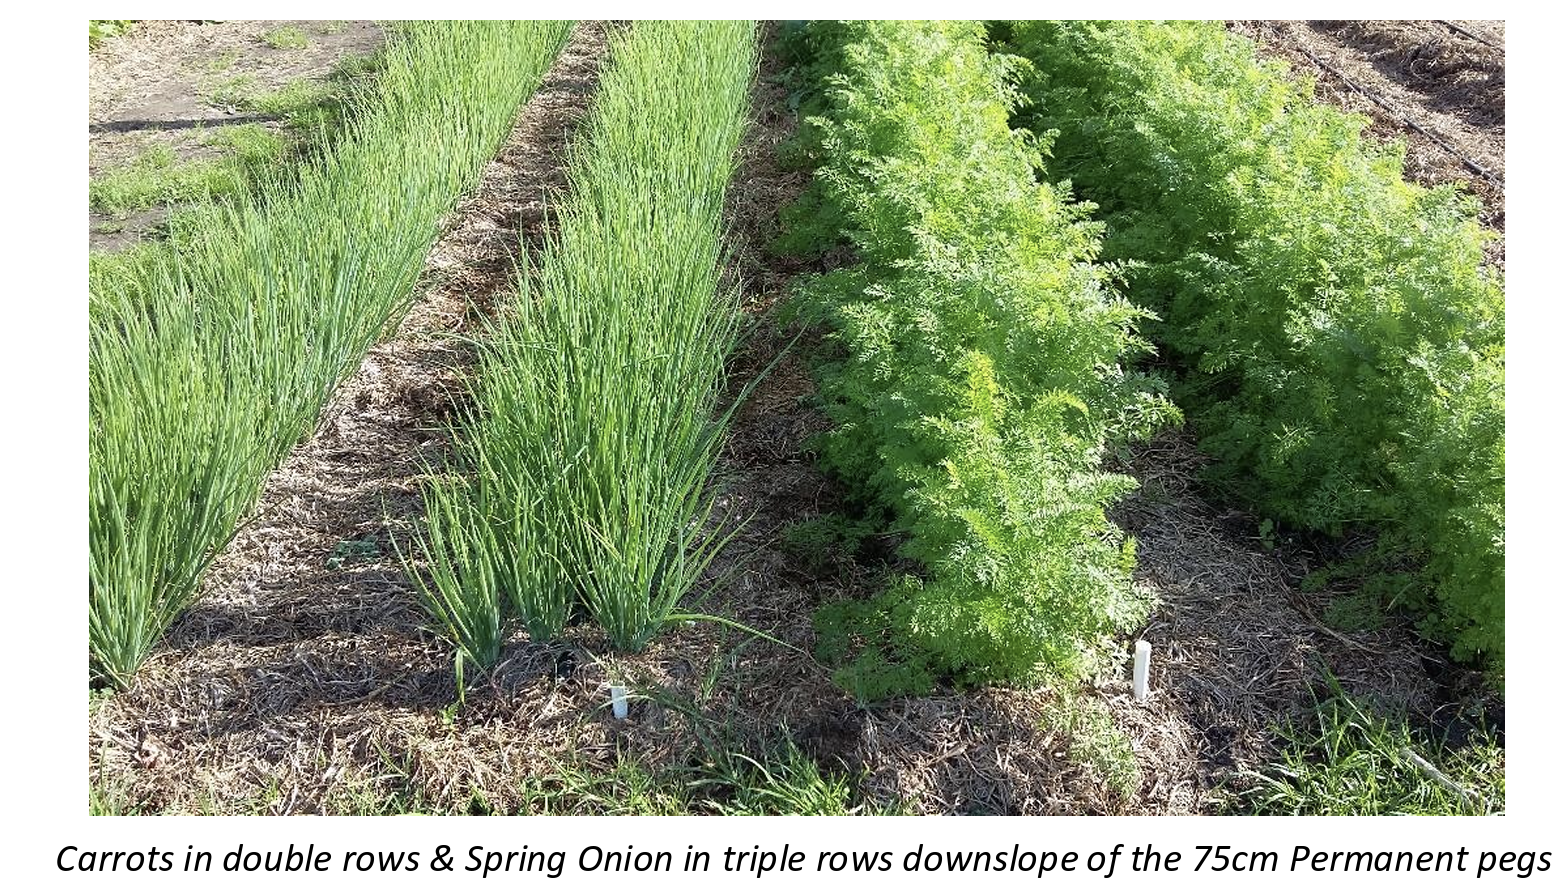
There are many ways to grow vegetables and many arrangements to do so, but we have chosen for simplicity sake to stick to the 75cm row spacing as it fits with a greatest variety of vegetable spacings.

For example, for beans, peas, sweetcorn, peppers, cabbage, cauliflower and eggplant, 75cm is ideal. Tomatoes and squashes are planted at 1,5m intervals so then simply skip to alternate rows. Spinach, rape and amaranth are planted in 37.5cm rows so simply split the 75cm rows in half. The narrow row vegetables such as carrots, onions, spring onion and beetroot, are planted in multiple 18.75cm rows (rounded up to 20cm to keep it simple), so simply split the 75cm rows into half and then half again.
In order to lay out your garden accurately with permanent 75cm row lines, make a 75cm measuring rope using a non-stretch rope as long as your garden is downslope. Hammer a peg in on the top side, make a loop in the rope and attach it to the peg. Run the rope down to the bottom side of your garden, make a loop in the other end, pull it tight and place it on another peg. With the rope taut, begin placing your 75cm markers onto this rope using either coloured wire or bottle tops or by feeding plastic strips in between the threads of your rope.
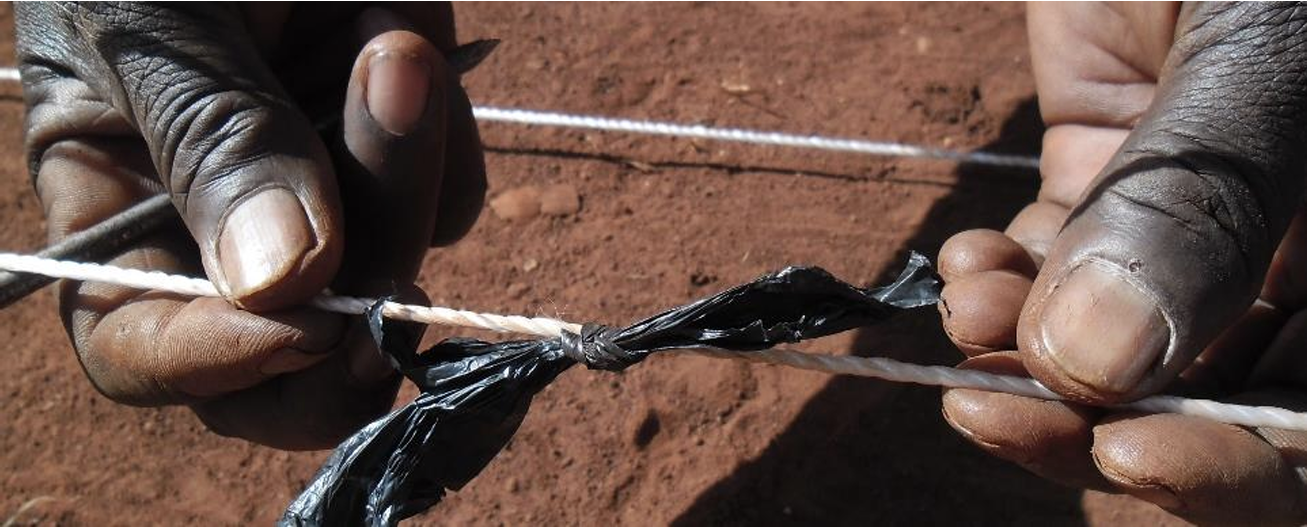
Repeat the process to make a 60cm measuring rope for planting stations for sweetcorn, tomatoes, eggplant and peppers and even a 45cm measuring rope for cabbages, cauliflower, broccoli and celery. These measuring ropes are essential to get accurate population densities for the crops that are planted with planting stations, and if they are made to a “high standard” they will be a valuable planting tool for a lifetime.
2.3.Garden Layout for Flat Planting on 75cm Row Lines
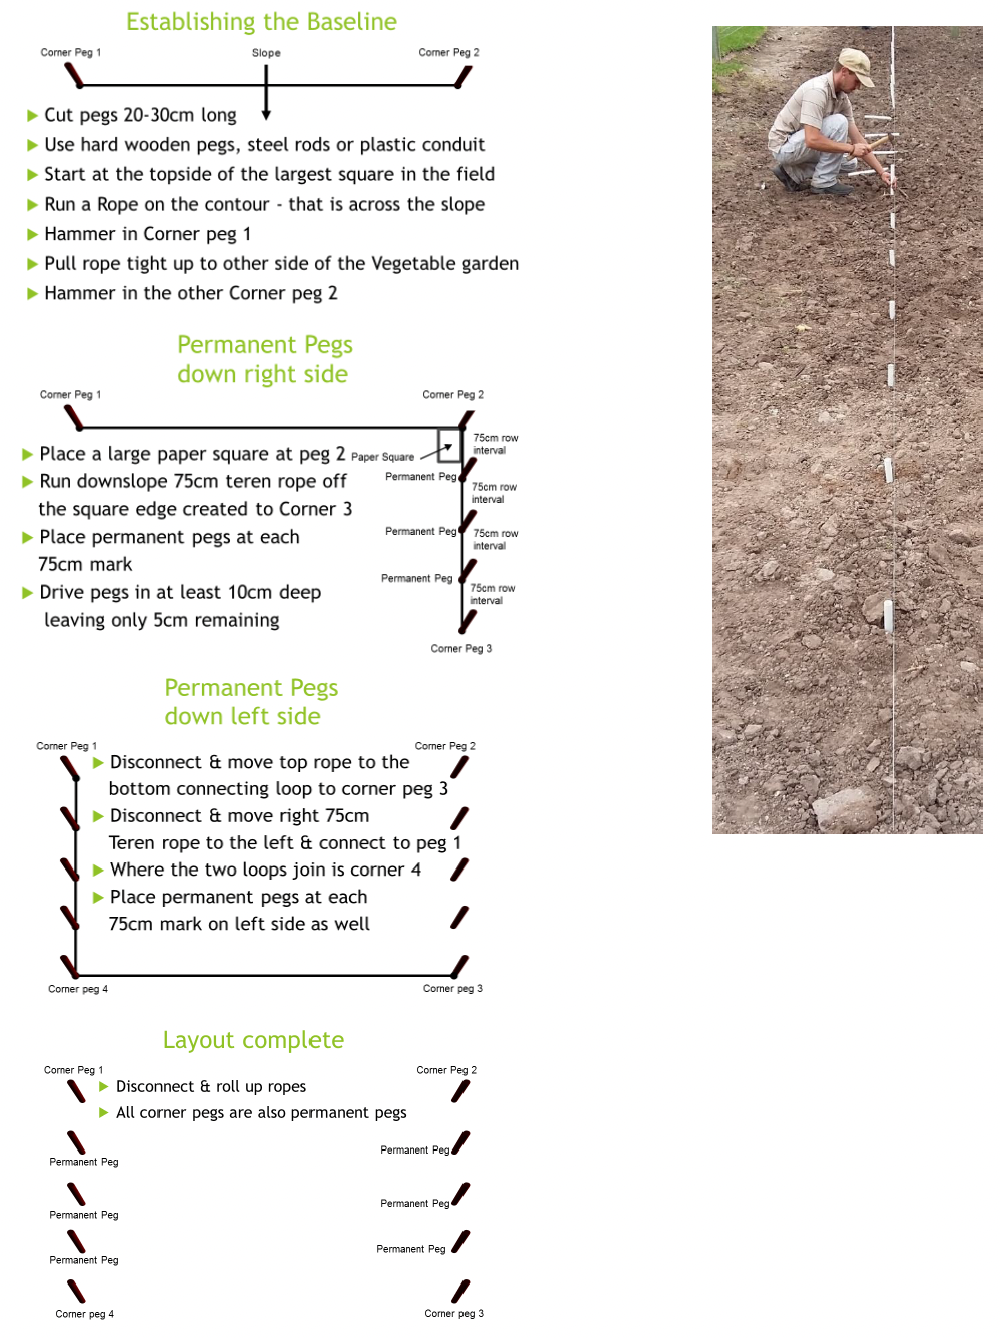
If your garden is not square, then by using the 2 adjoining pegs on the contour as a guide, extend each line one at a time, until you reach the outer edges and place your permanent pegs there. Once this is done you can remove all of the inner pegs.

The “permanent pegs” at every 75cm row line on either side of the vegetable garden, will ensure that you get the valuable attribute of permanence in your garden.
The benefits of permanence include:
1) improved soil fertility in the planting area
2) left over nutrients are available to following crops
3) improved soil structure in the planting area
4) decomposing root channels allow for greatly improved aeration and permeability
5) soil pH is improving all the time in the planting area
6) compaction only ever takes place in the walkways
7) soil disturbance is minimal resulting in greatly reduced weed incidence etc
One of our management keys is to do everything at “High Standards” and by keeping this design layout with permanent pegs every 75cm, we will reap great rewards from these standards.
2.4. Permanent Raised Beds for Waterlogged Conditions
In most instances flat planting, as per standard Farming God’s Way practises, is perfectly fine. With the correct layout, permanent walkways and heavy composting, a natural raised row system will develop over the years. However, if you have waterlogging risks or problems, then you need to raise the beds, as vegetables are extremely intolerant to having “wet feet”.
Design the orientation of the rows downhill, not on the contour. This means your top and bottom sides to your field will have the 75cm permanent pegs instead of the left and right sides. This enables the water to exit down the slope and drain away from the vegetable garden. Recommended dimensions for the permanent beds are 15cm high, 100cm wide on top, 120cm wide bases, with about 30cm permanent walkways. Note that there are two 75cm rows on top of the permanent raised bed and it is not a single row ridge. These two rows can be split to make 3 rows at 37.5cm or split again to 4 rows at 18.75cm with the multi rows going towards each other on the inside of the permanent pegs.
Once you have placed the 75cm pegs, then lift the soil from the 30cm pathways to place on top of the 100cm wide beds until 15cm high, which is enough to keep sensitive roots out of waterlogged soil conditions. If necessary dig a furrow at the bottom side of the field to allow water to exit the pathways more easily.
Although this is highly contrary to the principles of no ploughing, if you design this properly the first time at establishment, then these beds should be kept as permanent beds forever. God’s Blanket is used on top of the raised bed and in the walk way in the same way as when doing flat planting. Covering the walkway will help protect the raised bed walls from collapsing and suppress weed growth.

2.5. Irrigation Options
The land preparation for whether you are using watering cans, overhead sprinklers or drip irrigation has no bearing on the layout of the garden except if you are using flood irrigation in which case you will need to make sunken beds. We use drip irrigation at our model farm in Port Elizabeth, because of the very low rainfall of around 250-350mm annually, but we still use watering cans in the early stages after planting our crops. The principles of Farming God's Way apply irrespective of whether you have a watering can, sprinklers, drip or flood irrigation.
Watering Cans
This is the most common form of irrigation amongst small growers and although time consuming, it is in line with the Farming God's Way principle of using “what is in your hand”. Make sure that the nozzles are creating a fine spray and not a jet of water which can easily blast out new seeds and seedlings. Very often farmers are watering literally a few drops as they pass down the line which is really a waste of time. Instead water lightly and frequently when plants are young; and more slowly and deeply but less frequently as the plants get older and deeper rooted. Water on the sides of plants to limit the wetting of leaves of sensitive crops, which makes them susceptible to all kinds of diseases. The benefit of being able to walk down long lines with good traffic control, makes irrigating with watering cans really easy and efficient.
Overhead Irrigation
The use of overhead sprinklers on draglines is also very common and probably the cheapest field scale form of irrigation. When you design your garden layout be sure to allow for walkways to pull the hoses through the field at the required intervals. Ensure that the sprinklers overlap and are running at the required pressure, according to the manufacturers design, to ensure an even wet spread throughout the garden. One problem with overhead irrigation is the unavoidable wetting of leaf surfaces at each watering which makes the plants more susceptible to diseases. The water is also applied over the whole land and not just the planted areas which accounts for considerable wastage.
Drip Irrigation
Our drip irrigation design is a single drip pipe line at each 75cm row, with emitters at 30cm intervals, delivering 2 litres per hour. We water new seedlings daily, but once the plants are up and settled we irrigate only 3 times a week for a maximum of an hour, dependant on the weather. This is a quarter of what is required by conventional farming practices and a great cost and water saving, as a direct benefit of God’s Blanket.
Sunken Bed Design for Flood Irrigation
Many small scale farmers are getting access to treadle pumps and even canalised water, which when used correctly with canals, sunken beds and God’s Blanket, can allow for very successful vegetable farming to be done. The 75cm permanent pegs run on the contour lines across the slope as usual. Make level, sunken beds 1m wide down the slope and up to a maximum of 4m long across the slope. See the Flood Irrigation Basins diagram for more details.
Canals carry the water downslope, through the sunken bed matrix. To water the beds, block the canal temporarily with a sandbag and break the nearest bed wall to allow for water to enter the bed. Water to a maximum of 5cm deep per watering. Do not overwater as this causes severe soil damage. Once watering is done, repeat this process on the sunken beds below. It’s a very simple yet effective system and is particularly useful in the dry seasons where no risk of waterlogging occurs. In order to discourage over irrigation, do not build the raised edges too high.
Some Farming God's Way farmers in Malawi water their sunken beds 3 or 4 times throughout the maize growing season, as compared to the 12 times of the conventional farmers, which is a significant cost and time saving.

2.6.Garden Design
You now have a well laid out garden with permanent pegs every 75cm. Next you need a carefully thought through plan of Where, What and When you are going to plant.
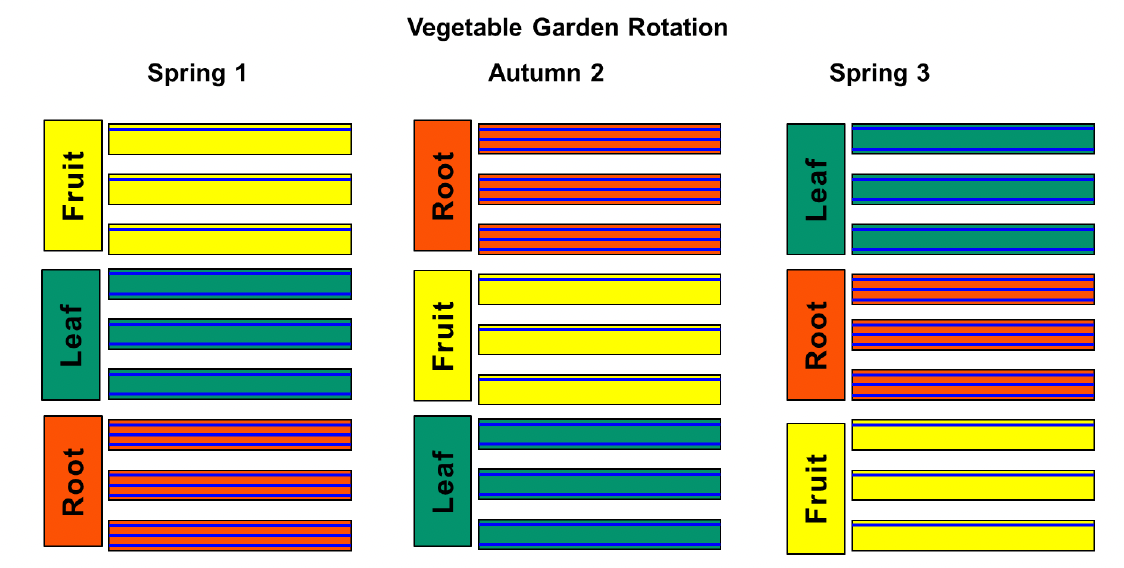
2.6.1 Divide into 3 Equal Portions
With all your 75cm permanent pegs in place, divide the number of pegs by 3 and remove one or two pegs from either side to define 3 equal portions. Into each of the portions we will plant Fruit, Leaf and Root crops and rotate them every autumn and spring or every six months in the more tropical climates.
Some examples of each include:
Fruit Crops – beans, peas, green maize/sweetcorn, tomato, eggplant, peppers, pumpkin, butternut, zucchini and patty pans.
Leaf Crops – spinach, kale, amaranth, cabbage, cauliflower, broccoli, lettuce, coriander and rocket.
Root Crops – carrots, beetroot, onion, spring onion, radish, sweet potato and irish potato.
2.6.2 Rotations
These three crop types should be rotated every six months to allow for all the benefits of rotation, including spreading risk, breaking disease and pest cycles, fixing of nitrogen and other soil improvements.

Rotation 1: In the first spring planting the fruit crops would be in portion A; leaf crops in portion B and the root crops in portion C.
Rotation 2: In the autumn rotation 6 months later the fruit crops move down to portion B; the leaf crops to portion C and the root crop come up to the top to portion A.
Rotation 3: In the spring planting 6 months later, the root crop would move to portion B; the fruit crop to portion C and the leaf crop to portion A.
Rotation 4: In the fourth rotation in autumn we would be back to Fruit in portion A, leaf in portion B and Root in portion C.
2.6.3 Rotations Within Rotations
Another aspect with short season vegetables is rotations within rotations. An example of this would be if you have a root crop that is harvested before the next 6 monthly rotation, then plant a different root crop in the same space. For example we often get 2 plantings of carrots followed by beetroot or spring onion and even up to 3 different root crops like beetroot followed by radish and then spring onion, all planted in the same row lines during a 6 month season. This rotation within a rotation, ensures that pests associated with one particular vegetable are not given a second home. It also allows for the garden to be in a continual state of productivity with each row rarely remaining “empty” for longer than 2 weeks, instead they are replanted immediately.
2.6.4 Staggered plantings
Each garden plan should include a simple 2 weekly staggered planting schedule ensuring a steady stream of income or home nutrition over a longer time period, whilst achieving our management objective of “minimal wastage”. This is particularly important with crops that get harvested at one time like spring onion, sweetcorn, cabbage, cauliflower, broccoli, lettuce and beetroot to name a few.

2.6.5 Planting “Baskets” of Vegetables
It is always best to start with the easy vegetables because if successful, then farmers will be encouraged to try again. After a few successful seasons, they can then start growing the other more difficult vegetables for their basket.
The recommended “beginner” Fruit crops are beans, sweetcorn and squashes; Leaf crops are spinach, kale and amaranth; Root crops are beetroot, carrots and onions.

See chapter 6 for some more detail on these and other crops.
It is not intended that all of these vegetables be grown at once as per this diagram but the basket could certainly include many more than just 1 crop per portion. Our model Farming God's Way vegetable garden often has 12-15 different crops in it at a time.
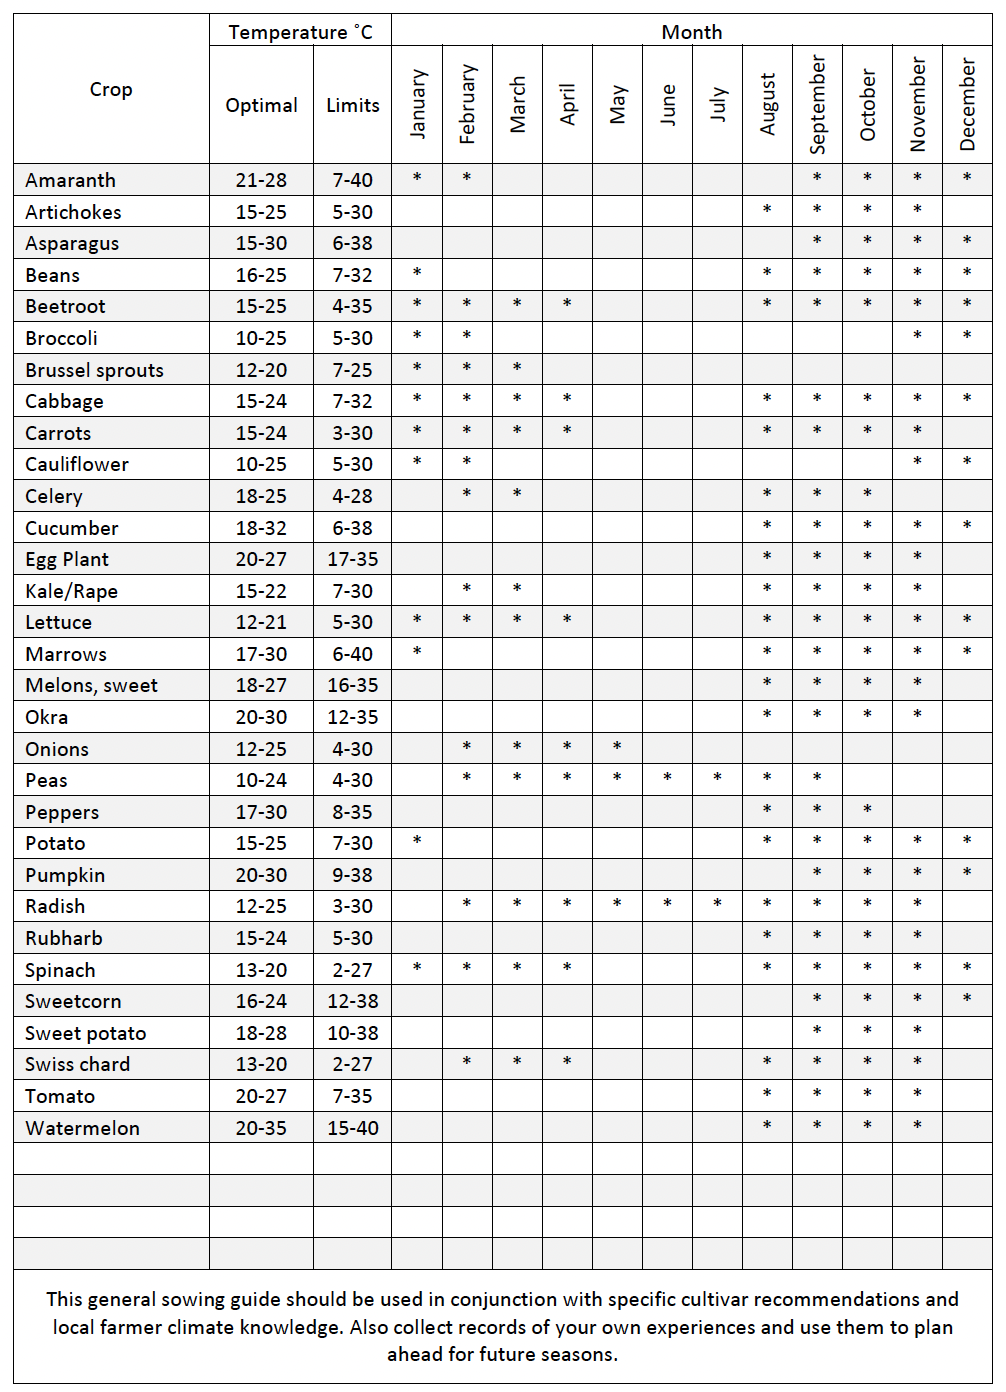
2.7 Planting Calendar
In Farming God's Way we encourage the management principle of doing things “On Time”. Every vegetable crop has optimal growing times, based on temperature and sunlight hours, and your planting and rotation planning need to take this into account. Use the planting calendar in the Vegetable guide to decide on when you are going to plant your various vegetable crops to be “On Time”. Feel free to make adaptions to this calendar guide based on your experience and locally available cultivars.
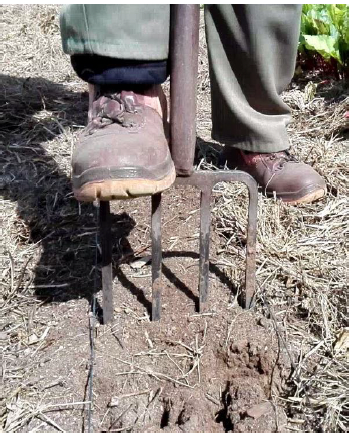
2.8 Fracturing
Vegetables have very weak root systems and so it is essential to loosen compacted soils to allow for successful production. Move “God’s Blanket” downslope of the band you are going to fracture, push the fork 30cm deep and gently pull the handle 10cm backwards until you see the soil just loosen or fracture. Do not be tempted to lift or turn the soil, you should be merely fracturing it. Keep on repeating this every 10cm moving backwards along the row line. You should only be loosening the soil in a fork width or 20cm band on top of the row lines you are going to plant to allow for “effective rooting depth”.
Before each planting determine if the soil compaction has improved by doing fracturing tests down the line. If the fork passes easily through the soil to fork depth then it doesn’t need to be re-fractured. If not then keep on being faithful to fracture with joy. The soil will be redeemed gradually through fracturing, compost applications and the activity of insects and earthworms.
2.9 Correcting Acidic Soils
Soil acidity is a very common problem in many soil types and climates, but it is also caused by acid rain, ploughing, decreased soil organic matter and chemical fertilisation. Acidic soils bind up plant available nutrients and cause all kinds of limitations to vegetable growth. To correct acidic soils we need to apply woodash, bonemeal or agricultural lime.
Woodash is readily available and is effective at reducing soil acidity with a pH of 10-12 when wet and contains between 25-50% Calcium Carbonates. However, woodash not only mitigates the negative effects of soil acidity, but also contains macronutrients such as Potassium, Phosphorus, Calcium, Magnesium and Sulfur as well as some micronutrients such as Iron, Manganese, Copper and Zinc beneficial for plant health, fruit colouration and vitality.
Bonemeal is made from crushed and finely ground bird, fish or animal bones. It is fairly expensive and not readily available, but it can also be homemade by steaming bones, then allowing them to dry for a month after which they can be ground into a fine powder with a mortar and pestle. Although bonemeal has a very limited influence on improving soil ph, it is high in Calcium (25%) and Phosphorus (12%) with some other nutrients like Iron, Magnesium and Zinc as well. Noticeable evidence of these slow release organic nutrients will be seen in your crops’ leaf and fruit colouration and overall health.
Lime is a fine white powder from powdered limestone rock deposits and is primarily made up of Calcium Carbonates, whereas dolomitic lime contains both Calcium and Magnesium Carbonates. It is very basic when wet and is very effective at increasing soil pH to good ranges. Lime is much stronger than woodash and so the application volumes need to be halved.
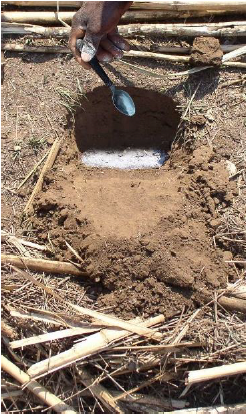
How these soil pH additives are applied will be determined by what input type you choose. A rule of thumb would be to evenly sprinkle 1 tablespoon of woodash/bonemeal or 1 teaspoon of lime, per planting station or every 60cm in the planting band. If you are unsure about the pH of your soil then go ahead and use woodash anyway for at least the first two seasons, thereafter do trials in your garden to determine the visible benefits between rows with and without it.
2.10 Inputs - Compost or Manure
The decision on “How to prepare and plant?” is dependant on your available input type:
Either A) “surface composting” your whole garden or in bands;
or using B) “manure or low volume compost” in planting stations, furrows or shallow basins.
This decision is crucial to make early on and is based on what God has placed in your hand, as is taught in the “Understanding God’s All Sufficiency” teaching. (See Biblical Key number 3 in the Trainers Reference Guide).
A)Surface Composting
God in His amazing wisdom has shown us through His creation how He designed to feed plants from the top, through the gradual decomposition of leaves, twigs and fruits over many years into compost and ultimately releasing stable organic nutrients into the soil profile. Surface composting techniques allow for this process to be sped up for an agricultural context and allows us to follow what our Creator has shown us from the beginning in the garden in the east of Eden.
Generally speaking, vegetables do better with compost than any other organic inputs, as it has nutrients that are bound in stable organic compounds in naturally created ratios, whilst also inoculating our soils with beneficial bacteria and fungi. When we refer to compost, it is to high quality, nutrient rich, mature, aerobic compost, made from appropriate ingredients noting the Green 45%, Woody 10%, Dry 35%, Manure 10% ratios specific to vegetable production where we are wanting more bacteria dominated vs fungal dominated compost. If your compost is still coarse after curing properly, then it is best sieved through a fine 2cm wire mesh, to ensure a fine seedbed without too many woody chunks. See Chapter 3 - Compost.
The basic procedure with surface composting is:
move the blanket downslope
fracture
correct pH
place surface compost
press furrows
plant and cover.
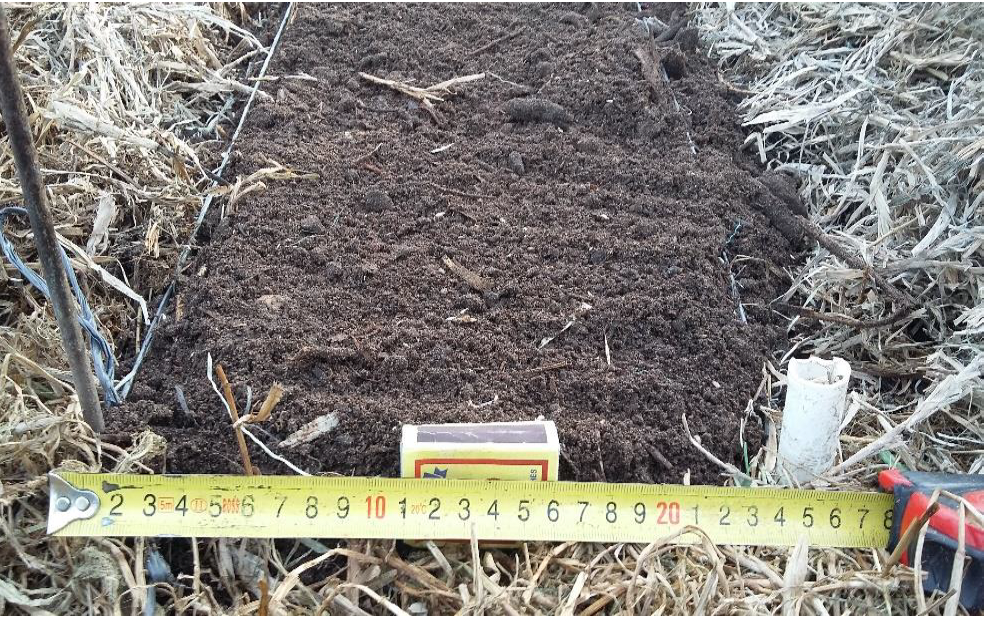
The width of the surface compost band is 10cm wide for single row crops and 25-40cm wide for multi row crops. The depth of compost will vary dependant on the crops’ feeding requirement – 2cm thick for light feeders, 3cm for medium feeders, and 5cm for heavy feeders.
Although your first season’s crop performance will not be at full potential, surface composting will give your soil a great head start towards God’s healing of the land and as you are faithful to sow into the soil, it will get better and better every season. It is essential to repeat surface composting diligently each planting to guarantee high plant available nutrients for the crops. However, when planting carrots or onions, the residual nutrients may be sufficient to get them through, depending on the soil’s fertility.
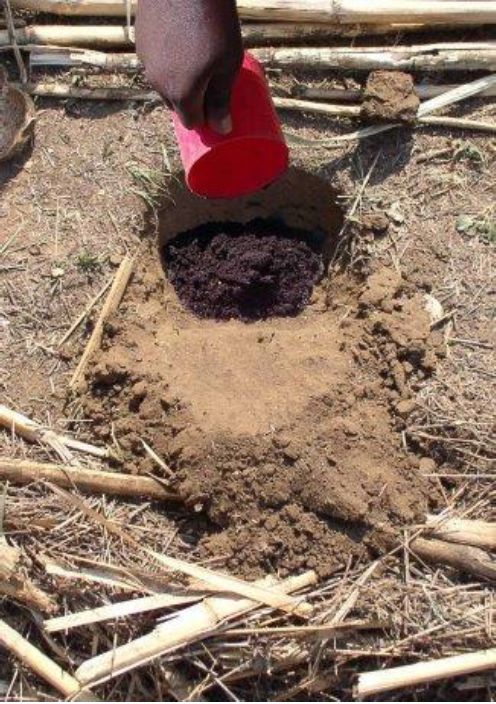
B)Manure/Low Volume Compost
Although it is preferable to use high quality Farming God's Way compost, most farmers/gardeners don’t have the volumes required at the start. Manure cannot be used in the same way as we do for surface composting as it will burn sensitive vegetable seeds, stems or leaves. However, it can be used in planting stations, furrows or basins with a 3cm soil separation layer. This separation layer enables Farming God's Way farmers to use fresh manure without any risk of burning seeds or seedlings and allows them to take full advantage of the readily available nitrogen.
If you are using manure or low volumes of compost it is very similar to the typical Farming God's Way field scale techniques. Move the blanket downslope, ensure you fracture to 30cm deep, dig planting stations, furrows or basins, correct the ph, add 500ml manure or compost, cover with at least a 3cm soil separation layer, plant and cover.
“Whoever sows sparingly will also reap sparingly, and whoever sows bountifully will also reap bountifully.” 2 Corinthians 9:6
Planting Stations
Planting stations are small holes that are prepared for many seedlings and seeded plants that have a wide plant spacing including tomato, eggplant, peppers, sweetcorn, cabbage, cauliflower and broccoli, amongst others. They should be about a standard hoe width 12cm across, 15cm long and 15cm deep.
Place the measuring rope on the permanent pegs, lift and drop it several times to make sure it is straight and tight. Looking up the slope, line up the centre of the hoe head with the measuring rope marker. Start digging 15cm away from the marker gradually going deeper and deeper as you come closer and closer to the marker on the rope. This usually takes about 5-6 strikes and is a large amount of soil so ensure that it is placed in a neat heap on the downslope side for refilling of the planting station later. Note how they are steep on the upslope side and shallower on the downslope side.
A variation of this planting station standard is when planting squashes, which are prepared a lot deeper to a spade depth and width and are then backfilled with a spadeful of manure/compost mixed in with the soil.

Furrows
Furrows are v shaped soil cuttings 10cm deep and 10cm wide in long straight lines that are prepared for many crops with close “in row” spacings including beans, peas, spinach, kale and amaranth. Place a rope onto the permanent pegs, lift and drop it several times to make sure it is taut and straight. Looking up the slope begin digging the furrow 10cm away from the rope, gradually going deeper and deeper until you come right up to the rope 10cm deep. The soil should be kept in a neat heap on the downslope side of the furrow for refilling later. A variation of this furrow standard is for sweet potato and irish potato where furrows are dug to 15cm deep.

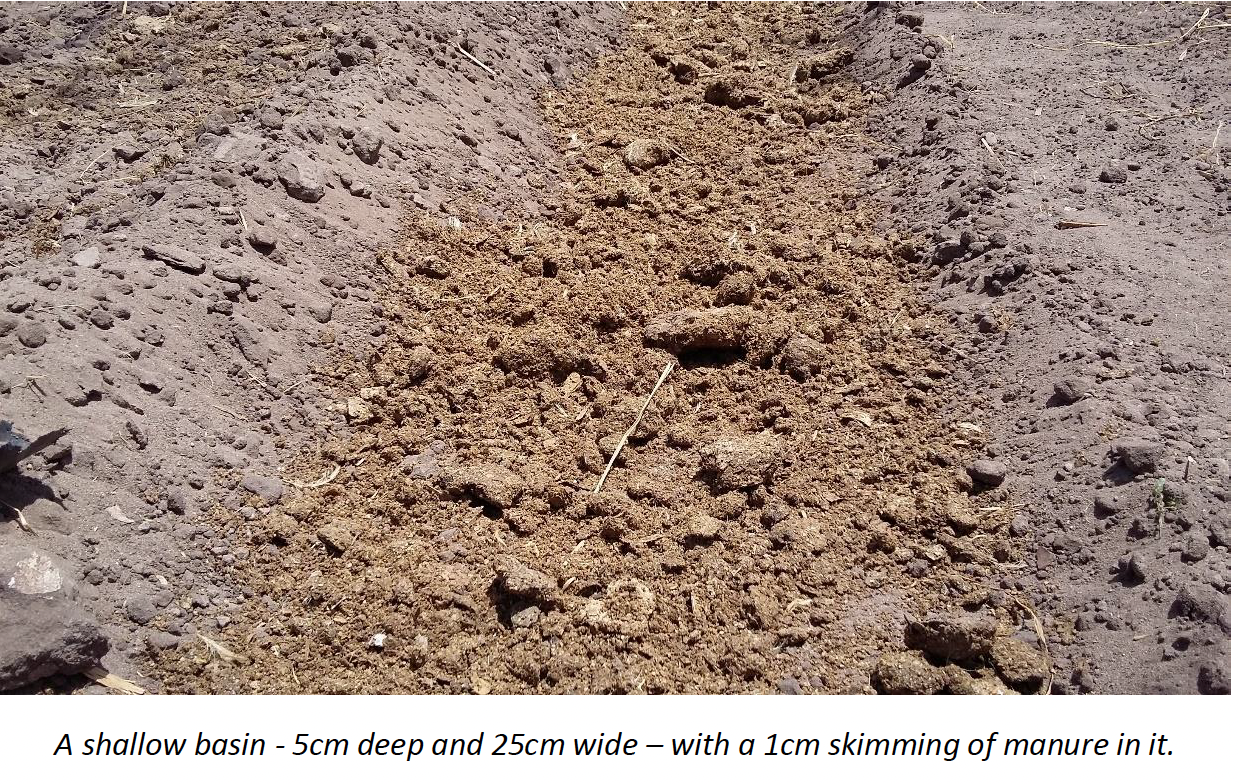
Shallow Basins
Soil preparation using the “Furrows Technique” for row intervals less than 37.5cm is very difficult to achieve, unless you prepare and plant one row at a time. Instead use “Shallow Basins” which are wide furrows used for planting small crops with narrow “in row” and “row” intervals. These crops are grown in double, triple and quadruple row designs in 25-45cm wide basins, which are 5cm deep, and include beetroot, carrots, onion, spring onion, lettuce, coriander, radish and rocket.
The techniques for both using surface composting and manure will be discussed for each crop to allow for everyone to start with what God has put in their hands, but it is definitely preferable to shift to a surface compost based system as soon as your compost is ready, from soil health, productivity and sustainable profitability perspectives.
2.11 God’s Blanket
God’s Blanket is the heavy mulch cover that God in His wisdom designed from the very beginning of creation, and consists of plant leaves, twigs and fruits all in different layered states of decomposition on the surface of the ground. It is this blanket in its various stages of decomposition which creates the climate and food for living organisms to flourish; reduces evaporation, runoff and erosion; improves soil moisture holding capacity and permeability; and prevents UV light sterilisation, amongst many other reasons (see “20 reasons Why We Do the How” in the Farming God's Way Trainers Reference Guide).
Healthy people eat healthy plants which come from healthy soils which are living soils!!! We must do everything we can to encourage soil life, just like our heavenly Father has shown us in His Creation since the beginning.
God’s Blanket is also exceptionally beneficial for weed control. If we see weeds in our Farming God's Way gardens it is because the blanket has decomposed and become a sheet!!! We don’t weed our model garden, we simply apply more blanket to get it up to the 100% cover and 2.5cm thick standard. This method of weeding is called “smother mulching” and is incredibly effective even against the hardiest of weeds and creeping grasses.
If you need to weed, then simply pull out the weeds by hand or cut them off at the surface with a hoe without disturbing soil. Do this at the 1 inch or white hair stage to ensure no weed regrowth.
When preparing for planting, simply move the blanket downslope of the planting area. Don’t remove it out of the garden.
After planting vegetables from seeds, ensure that the blanket is not covering the area directly above the seeds, as they are not strong enough to germinate through the blanket. Leave a narrow space of 5cm to allow for good germination. Thereafter the blanket can be brought up against the plant bases.
God’s Blanket must never be incorporated into the soil as this can cause negative nitrogen periods, so be careful not to press it in whilst fracturing or when using the dibble stick for transplanting seedlings. Also don’t cover it with surface compost or soil.

In the 1960’s a lady by the name of “Mrs Mulch”, Ruth Stout, clearly documented her very simple system of heavy mulching (60cm of straw) in the autumn and planting directly into the decomposing material near the soil level in the spring, with almost a 20cm wall of mulch on either side of the rows. She did no applications of anything else, no compost or fertiliser or manure, no green manure cover cropping, simply heavy mulching. She appropriately honoured God by saying in her book, “Gardening without Work” – “I never invented mulch, God did!!!” Although her heavy mulching is a proven system, it takes some years to be fully productive and the amount she was using is unpractical on any large scale.
We advocate God’s Blanket to cover 100% of the soil surface and to be 2.5cm thick in most cases. God's Blanket should be continually on our fields whether growing vegetables or field crops, irrespective of whether you are doing 1m2 or thousands of hectares.
You can use any organic material at your disposal including grass cuttings, thatch grass, banana leaves, palm fronds, bulrushes, forest leaves or maize stalks, however the finer materials are easier to handle in vegetable gardens.
You can also grow your own blanket material using green manure cover crops (see “Green Manure Cover Cropping” in the Farming God's Way Trainer's Reference Guide).