Processing
A major goal with a processing unit is to have a range of coffee products that meet the needs of different customers and manage the environmental impact of the wet mill in a sustainable manner.
Different processing methods will have a different cost basis and a cost of production analysis for all methods carried out is important for effective marketing and sale of finished products.
LOT SEPARATION AND IDENTIFICATION
Quality of coffee is determined during plant growth. Quality cannot be gained but can be lost during processing. Effective lot separation throughout processing maintains quality potential and identifies all unique coffee lots through the system to the end buyer.
Identifying lots with as much information as possible has a number of advantages and helps in:
Detailing information required for third party accreditation
Quality feedback to farming and harvesting
Process refinement at the wet mill
Identifying lots with potential for high value market segments
Aiding blending and lot management at the dry mill
Providing marketing material for end buyers
FIGURE 25: DAY LOT IDENTIFICATION AND CODING FOR THE SPECIALTIY MARKET
Information collected at farm units or washing stations can include:
Date Code
Farmer or Plot Code
Third Party Certification
Cherry Selection Grade
Lot Variety
Lot Size
Post-harvest Process Used
Hours Fermented – if applicable
Hours Soaked – if applicable
Drying Time
Drying Medium
Screen Size – if applicable
WHICH CHERRY FOR WHICH PROCESS?
Climatic conditions at the wet mill will impact on which processes are possible and how this is carried out. Beyond these environmental factors the range of products and associated value and flavour profile are determined largely by the initial quality of harvested cherry. The level of ripeness leads to big differences in moisture content, anatomy, and chemical composition48. Identifying coffee into different homogenous categories and processing accordingly improves overall efficiency.
Partially ripe and green unripe coffee can develop off taints and black beans as a result of elevated drying temperatures. When processed as natural processed coffee the risk of defective beans and fermented or immature cup notes is higher. This coffee is best pulped and either processed as washed or pulped natural coffee.
WASHED PROCESS
The goal of washed process is to remove the pulp and the mucilage surrounding the coffee bean prior to drying and is the most common method for post-harvest processing used in Malawi. This process requires the most resource inputs in terms of water, electricity and equipment and the technical knowledge needed.
Depending on factors including altitude of growing and level of ripeness of the coffee cherry the mucilage content in Arabica can vary from 16 – 22%.
Fermentation times will vary substantially from wet mill to wet mill and can fall between a range of 6 to 72 hours. Some factors that can cause variations to occur are:
Higher ambient temperatures and humidity will speed up fermentation
Thicker mucilage will speed up fermentation
Ripe coffee cherries will have a higher concentration of peptic enzymes and will ferment faster
Higher temperatures and thicker mucilage
Dry pulped coffee will ferment faster than wet pulped coffee
Wet fermentation is slower than dry fermentation
A smaller weight of de-pulped coffee will ferment slower
Smaller coffee seeds will ferment faster than larger ones
It is important to manage quality on a daily basis and know exactly where production issues are happening. A similar form to the picked cherry assessment can be used at the wet mill by analysing 100g of de-pulped coffee in the main channel for any possible issues. Split the selection into:
Small Cherries
Skins
Greens
Brokens/Whites
Sound
Amend machinery settings accordingly and also picking quality the following day for feedback loop
Vital to successful washed processing is hygiene control at the wet mill. Coffee processing is a food production area and should be treated as such. Once any post fermentation channelling and washing has been completed, the wet mill team carry out a full clean down of:
All pulping equipment – removing any skin or bean residues with pipe cleaners and wire brushes
All pre and post fermentation channels
All fermentation and soaking tanks
Prior to production starting the wet mill manager is then responsible for walking through the whole process flow checking machinery, channels and tanks for any residues or remaining beans. Once they are happy that the system is clean they can sign it off for production.
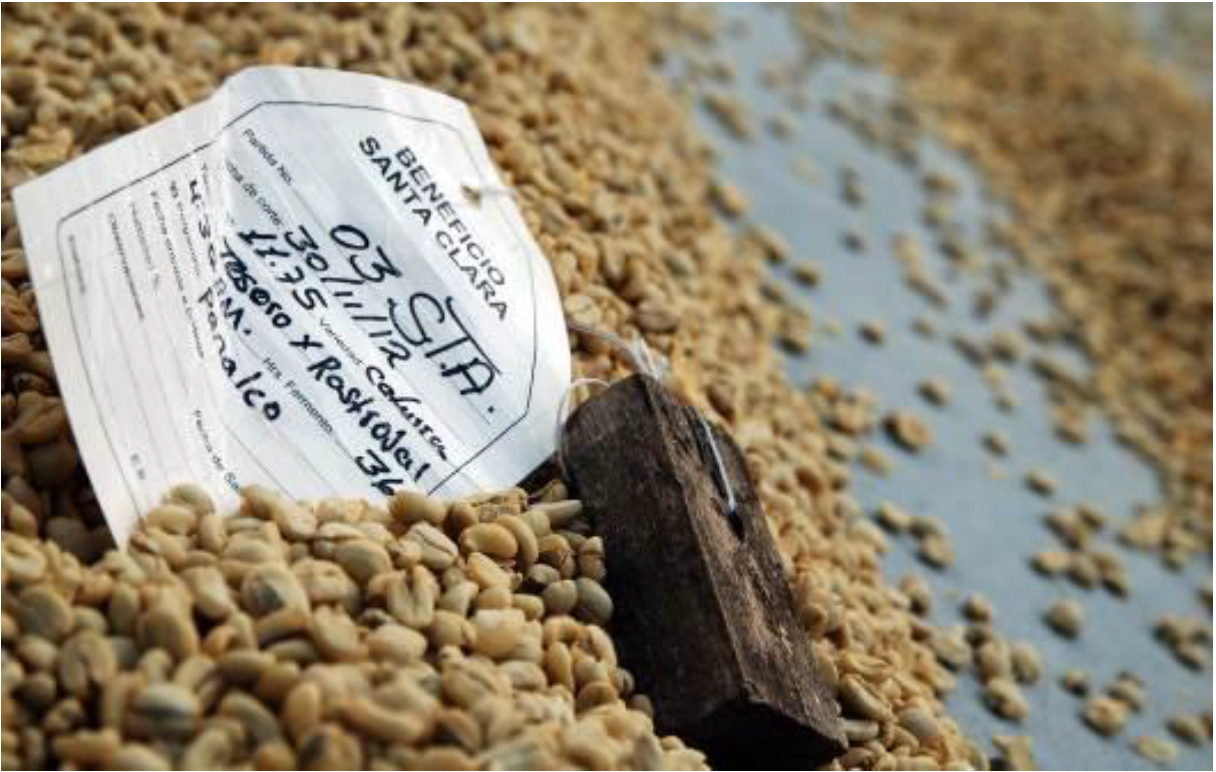
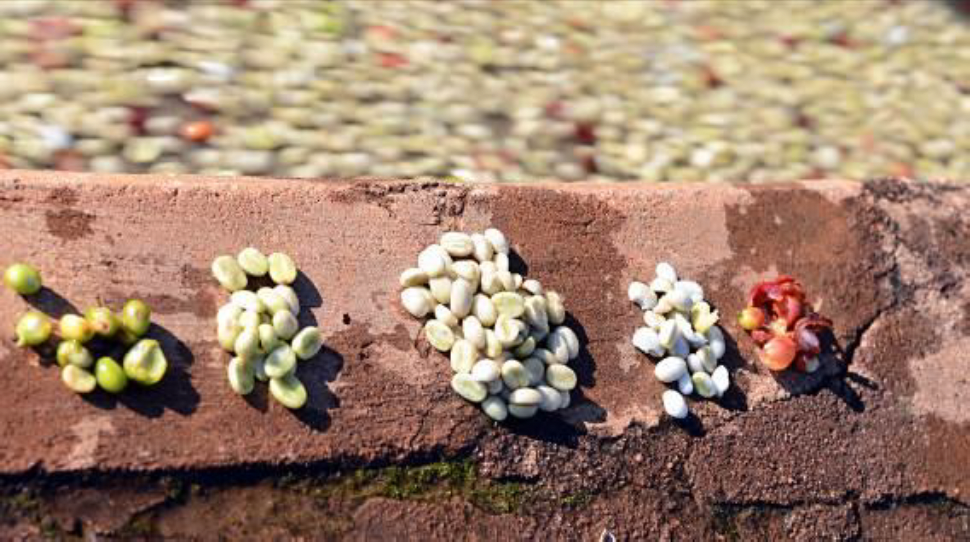
FIGURE 26: ANALYSING PULPER DEFECTS
TIPS ON GOOD PULPING
PULPER DISCS
Coffee pulper discs must have a rough surface for pulping clean parchment coffee. Worn discs can be roughened using an angle-grinder to deepen the grooves, followed by eutectic welding. It may be cheaper to purchase new discs. If the disc is in good condition, an old file can be used as an electrode at 100 to 110 amps, and this will roughen the disc. Worn discs cause;
Too many skins in the fermentation tank
Coffee can be bruised which causes loss of quality. This occurs when the operator moves the breast-plate too near the disc trying to remove the skin.
Coffee cherry blocks at the feed end of the pulper
BEARINGS
The bearings need to be in perfect condition i.e. no side play at all. Any adjustments made to the pulper when bearings are not perfect will be useless.
KNIFE
The knife must be in good condition and should be one hacksaw blade gap for the entire length of the knife. Check for wear in the middle section of the knife.
BREAST PLATE
The breastplate must be 8 mm from disc. (Biro pen or pencil or 19-mm Gedore Spanner).
NYLON FINGER
Nylon fingers should be set about 5 - 6 mm away from the disc.
If there is a lot of un-pulped small bean:
Increase the tension on the fingers
Move the fingers in slightly
If cherry blocks with normal feed, move fingers out. On certain makes of pulpers, the rib can be built up or replaced for better pulping. Baines pulpers have fixed fingers mounted on the plough.
COFFEE GRADER
On the coffee grader, a siphon feed system will reduce skins in the fermentation tank. A 12-mm punch plate produces better grades than the square mesh screens, and is cheaper to maintain. It is advisable to drill out the last section of screen to 13 mm. This will allow the AA and 'elephant' coffee beans to go into the first grade.
DISC PULPERS: FAULTS AND REMEDIES
FAULT OR SYMPTOMS: Many berries passing through pulper without being pulped
POSSIBLE CAUSE: Plough set too far away from disc; Cherry of incorrect ripeness
REMEDY: Adjust plough to a closer setting; Take more care in picking
FAULT OR SYMPTOMS: Nipping of breaking of beans and/or fragments of beans being passed through with the pulp on the back sheet
POSSIBLE CAUSE:
Plough set too close to disc
Knife set too far away from disc
End Float of disc shaft
Cherry is of incorrect ripeness
REMEDY:
Adjust plough to wider setting
Adjust knife to a closer setting – 1.5mm or less clearance is required
If due to worm bearing they must be replaced.
FAULT OR SYMPTOMS: Whole beans being passed through with the pulp on to the back sheet
POSSIBLE CAUSE: Knife set too far away from disc
REMEDY: Adjust knife to a closer setting - 1,5 mm or less clearance is required.
FAULT OR SYMPTOMS: Excessive amount of pulp being delivered with pulped coffee
POSSIBLE CAUSE:
Rate of feed into the pulper too high
Disc surfaces have become polished
REMEDY
Reduce feed rate until satisfactory delivery is obtained.
For quick temporary improvement, etch disc surface with hydrochloric acid
For longer lasting repair surfaces should be sand blasted. New discs required.
FAULT OR SYMPTOMS: Flow of coffee ceases, or almost ceases
POSSIBLE CAUSE:
Foreign material, such as leaves or twigs, have entered the pulper causing a blockage
Feed rate too high
Over-ripe coffee being pulped
Undue delay between picking and pulping
REMEDY
Stop machine and clear the blockage, if necessary removing the breast plate to do so
Cut off the feed altogether until machine clears itself, then continue to feed at a reduced rate. If the lowest possible feed is excessively high, attention should be given to the disc surface
Take more care in picking
Pulping to be carried out on the same day as picking whenever possible
Increase water flow
FAULT OR SYMPTOMS: Intermittent ringing sound coming from disc pulper
POSSIBLE CAUSE:
Knife or knives set too close
Loose disc shaft
One of various cover plates fouling discs
Slots in hopper not correctly aligned
Hard object trapped
REMEDY:
Adjust knives to a wider setting of 1,5 mm
Check bearings
Adjust
Adjust, usually by means of a screw in the pulper side frames
Remover
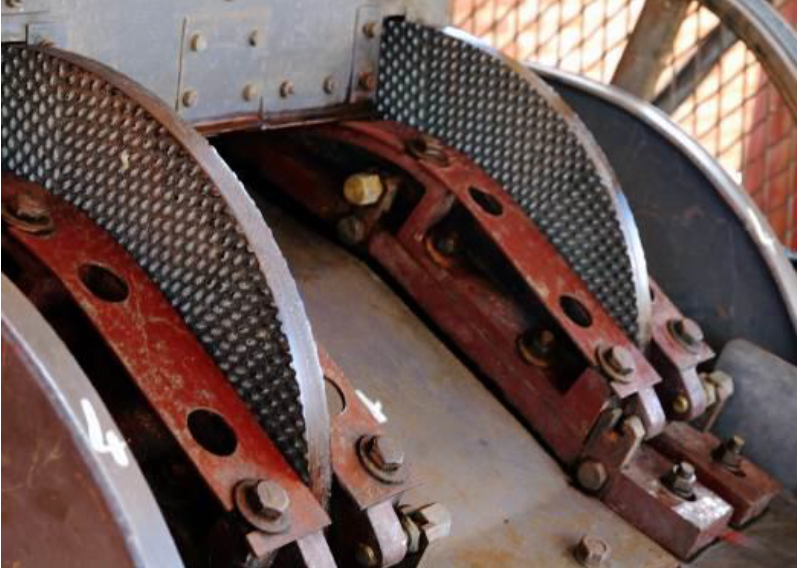
FIGURE 27: CLEAN AND WELL MAINTAINED DISC PULPER AT WASHING STATION
MUCILAGE REMOVAL METHODS
There are three main methods of removing mucilage. Of these the dry and wet fermentation methods involve a biological fermentation caused by the enzymes pectinases and pectase51. Mechanical mucilage removal, often termed eco-pulping, involves a physical stripping of the mucilage from the bean.
Prior to all fermentation methods some pre-grading of de-pulped coffee by size produces a more homogenous fermentation mass. Once fermenting, the acidity of the coffee mass falls from approximately 5.5 to as low as 4.1pH. Mucilage can be washed clean at a pH of 4.6 and wet mills will typically work between a range of 4.6 and 4.1pH depending on internal standards and specifications. Negative sensory attributes can develop when pH drops below 4.0.
Dry Fermentation
The basic process is:
Coffee is weighed prior to pulping
Floaters are removed via a washer separator or floatation
Coffee passes through a pulper
De-pulped coffee is transferred to fermentation tanks.
Lot details including the start time of fermentation are recorded on the appropriate tank(s)
Water used for transfer of the coffee is drained from the tanks.
The mass of de-pulped coffee is levelled into an even bed.
These are then covered for the period of fermentation. This prevents the top of the coffee drying or rain falling into the tank.
After 12 hours the coffee should be turned using a wooden paddle and stamping of feet (wearing gum boots). Water is sometimes added and then removed to assist with turning; however this can increase the fermentation time and may interfere with quality.
Dry fermentation can take anywhere between 12 – 40 hours depending on environmental conditions, mass size and coffee quality. Checking for fermentation must be done in the early morning, as if the fermentation process is complete, the sooner the coffee is washed and graded and put out to skin dry the better for quality.
Rub Check: A handful of coffee is rubbed between two hands under running water or in a bucket of clean water. If coffee is "gritty" and not slippery, fermentation is complete.
Stick Check: The handle of a channelling paddle is pushed into the fermenting coffee and immediately pulled out. If this is tested five times and the holes remain for 30 seconds or more then fermentation is complete
pH Check: Methods exist where the pH of the bean mass can be checked to ensure that mucilage has been degraded and that fermentation has not continued too far. This can involve the use of electronic meters or specially designed pH measuring sticks.
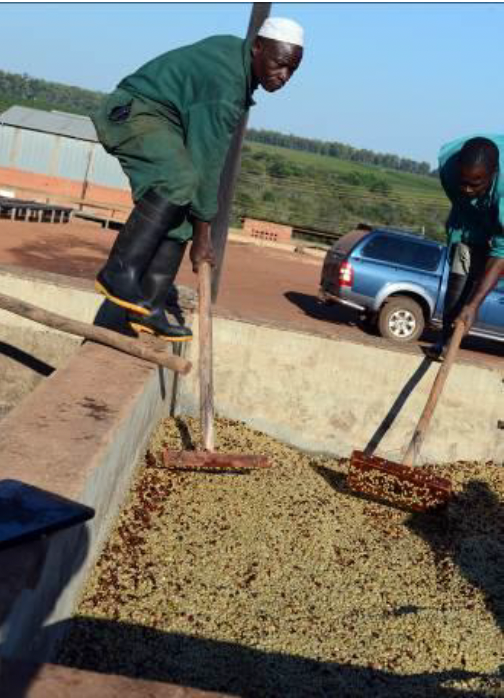
FIGURE 28: DRY FERMENTATION
Wet Fermentation
The wet fermentation method uses between 5-10 litre of water per kg clean green coffee more than dry fermentation but has benefits in terms of consistency of fermentation, bean appearance, and cup profile (see ‘Impact on Cup Quality’) below. This method is slow and whilst the conversion of sugars to acids is more efficient at the beginning of fermentation, the process slows considerably towards the end53. If fermentation times become extended and there is a risk of developing negative sensorial attributes, water up to a temperature of 40°C can be used for this method54.
Coffee is weighed prior to pulping
Floaters are removed via a washer separator or floatation
Coffee passes through a pulper
De-pulped coffee is transferred to fermentation tanks
Lot details including the start time of fermentation are recorded on the appropriate tank(s)
Water used for transfer of the coffee is drained from the tanks
The mass of de-pulped coffee is levelled into an even bed
The tank is then refilled with clean water to 2cm above the coffee level
The tank is covered with a framed tarpaulin. This prevents rain falling into the tank.
It should be noted that wet fermentation is usually only used in the last day of fermentation and early the following morning before the coffee is washed and graded. This method has not been recommended due to reduced quality of the coffee as mentioned previously, however improved quality coming out of Ethiopia, Kenya and Central America suggests otherwise.
Wet fermentation typically takes between 20 – 60 hours depending on environmental conditions, mass size and coffee quality. If fermentation extends beyond 72 hours the formation of ‘stinker’ beans increases55. To ensure fermentation is optimised the later stages are checked regularly at hourly intervals by either: Recycled water can be used which can reduce time but the pH and number of time water can be used should be monitored. Water with a pH below 5 should not be used.
Rub Check: A handful of coffee is rubbed between two hands under running water or in a bucket of clean water. If coffee is "gritty" and not slippery, fermentation is complete.
pH Check: Methods exist where the pH of the bean mass can be checked to ensure that mucilage has been degraded and that fermentation has not continued too far. This can involve the use of electronic meters or specially designed pH measuring sticks.
Mechanical Removal
Mucilage can also be removed from coffee by friction and upward flow mucilage removers are the most common type on the market. These machines have a vertical drum pulper that feeds pulped coffee into an endless vertical screw. Agitators in this screw rubs the coffee beans against each other, removing the mucilage. Water use and environmental impact of this process is much lower.
This type of machine can allow bypassing the mucilage removal if honey-process coffee is required.
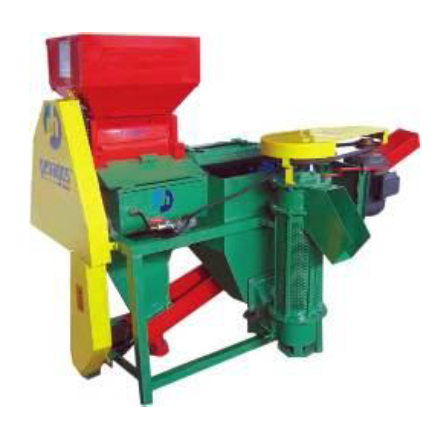
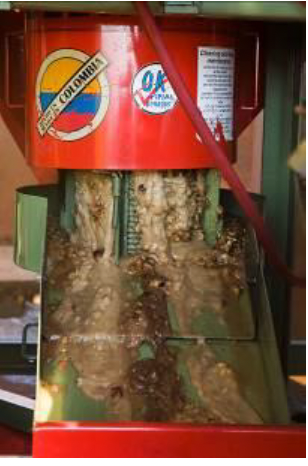
A PENAGOS ECO-PULPER and MUCILAGE OUTPUT FROM ECO-PULPER
Basic process flow is:
Coffee is weighed prior to pulping
Floaters are removed via a washer separator or floatation
Coffee is de-pulped and mucilage removed
Coffee is passed either to a fermentation tank or directly to the raised beds
Lot details are recorded on the appropriate tank(s) or raised beds
If coffee is passed to the tanks, the small volume of water used for transfer of the coffee is drained from the tanks
The mass of de-mucilaged coffee is levelled into an even bed.
These tanks are then covered overnight. This prevents the top of the coffee drying or rain falling into the tank. Care must be taken as to what material is used to cover the coffee as the coffee could become tainted, such as with the use of hessian cloth or old fertilizer bags.
If mechanically removed mucilage is soaked for 24 hours after processing no bio-chemical reaction takes place. Instead the centre cut is cleaned via minor fermentation, and improved appearance resulting from a process similar to a post fermentation soak takes place.
CHANNELLING
Grading channels are usually made of concrete and designed to:
Remove any remaining mucilage from coffee as it leaves fermentation
Separate wet parchment into grades by density
The process involves:
Wooden slats should be 7cm deep and placed at strategic intervals along the grading channel. Use 2 to 3 slats on top of each other to slow the grading process and allow sufficient time for floaters and skins to be removed.
The coffee is released into the channel.
Skins and floats are removed first, flowing over the wooden slats which act as weirs.
Heavies are held back against wooden slats across the channel which act as weirs
Wooden paddles are used to move coffee against the flow to facilitate grading as it flows over the paddle.
This process also washes remaining mucilage away Slats are added or removed as grading progresses. The objective being to get all lighter coffee to be at the far end whilst keeping heavies at the top end.
After 3 sections of the grading channel have been graded, remove the top slats to allow further grading to occur and check the quality, and complete the procedure by allowing the coffee to move nearer to the discharge (this will save time and water).
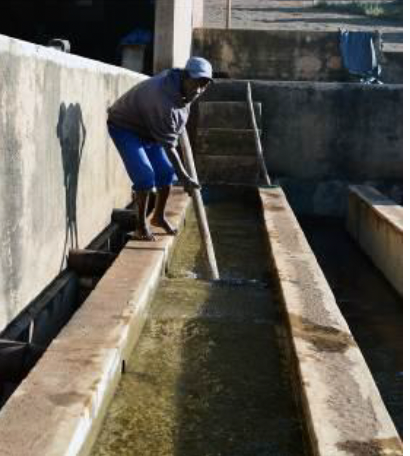
FIGURE 31: CHANNELLING
SOAKING
After fermentation and channelling coffee can be soaked for a further 24 – 48 hours if required. This is done to:
Improve bean appearance by whitening the centre cut and removing silverskin.
Improve appearance of coffees where mucilage was removed mechanically
Remove some minor bitter compounds including polyphenols
Delay movement to raised beds for drying if no bed capacity is available without deterioration of coffee quality
However, this requires a further 5 – 10 litres of fresh water (which can then be recycled) so there is a labour and environmental impact.
DRYING
Wet parchment has a total moisture content of approximately 65% and the goal in drying is to achieve 12% total moisture in a controlled manner over a period of approximately 10 – 12 days. It is important that skin drying is done in one day to prevent tainting and therefore maximize quality. For this reason coffee is best washed and graded early morning and put onto drying tables.
The drying stage for all coffee can be split into three phases:
A lag phase
A linear period of maximum change
A deceleration phase
The starting lag phase is easiest to manage with washed coffee compared to other processes because moisture reduces relatively quickly compared to natural process coffee, and the mass is easier to move than honey process coffee. However, it should still be closely monitored. High quality raised beds are the most efficient medium for drying washed process coffees and the process flow is as follows:
Spread the coffee lot across the raised bed to a height of 2-3 cm across the width of the raised bed.
Once flattened the first task is to remove all defective beans and residual skins from the coffee mass. Defective beans are easier to remove on the first day of drying because they are easier to detect. Correct grading channel techniques will reduce hand picking of defective beans which will be in the third grade.
Turn the coffee every 15 – 20 minutes.
After moisture content reaches 30% it is skin dry.
During the hottest part of the day (11am to 2pm) parchment should be piled into a ridge and covered. This prevents mass temperatures rising too high and promotes moisture equalisation through the coffee lot. If the coffee is regularly turned it is not necessary to cover, but labour must be available during the lunch hours to turn the coffee on the drying tables. A hand rake is a useful tool for this operation.
During periods of rain and at night cover the coffee with plastic sheeting or tarpaulins to prevent re-wetting.
For optimum quality the maximum temperature of the drying coffee should never exceed 35°C. Quality deteriorates when the drying coffee mass exceeds 40°C.
Split parchment is a sign that the coffee has not been turned on a regular basis especially from 12 midday to 2pm.
Removal of defects continues over the full drying period.
Drying mass should never exceed 3cm in depth when the coffee is drying from 25 to 12% total moisture.
Washed parchment produced in a clean environment will turn a light bright yellow hue as it dries.
The total drying time is usually between 10 – 12 days, however, the number two’s and three’s should be thicker on the drying tables after skin drying so that 10 to 12 days drying can be achieved and avoid over-drying.
Once the total moisture reaches 11%-12% the coffee can be weighed and stored.
FIGURE 32: SORTING WET PARCHMENT
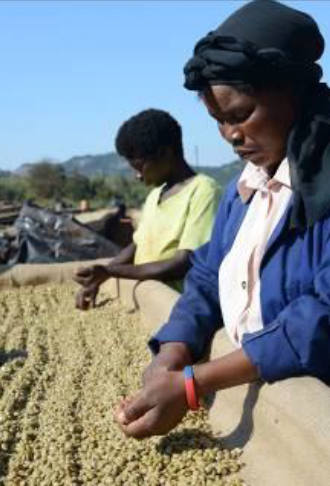
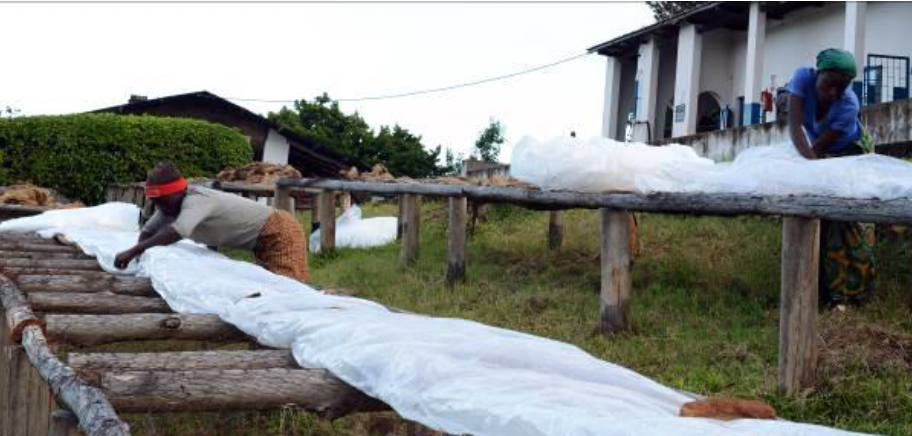
FIGURE 33: COVERING DRYING TABLE AT END OF THE DAY
IMPACT ON WATER USE
Understanding how to efficiently use water at a wet mill is central to good processing practice. Reducing water use by process management and recycling where possible reduces the volume of residues needing further treatment. A summary of recycling options are:
Use recycled water for floatation/washer separating
Use recycled water for pulping
Use recycled water for fermentation
Use clean water for channelling
Use clean water for post fermentation soaking
Fermentation times and cup quality will be altered by the amount of recycling taking place so ongoing assessment in relation to product quality is recommended
Good wet mill management included the monitoring of water used per kg clean green coffee. Depending on the machinery type and process control this will vary from 30 litres per kg with fully washed coffees using a vertical disc pulper to as little as 1.5litres per kg with ecological mechanical mucilage removal.56
Waste Water
Waste water from coffee processing can damage local eco-systems and must be treated prior to release into the wider environment. Total and suspended solids are higher in water used for wet processing and the pH is lower than clean water.
Prior to water filtration all solid organic matter should be removed by sieves and composed separately with residue coffee pulp. The remaining water is then transferred by pipe to a pond system.
Pond Systems
Treatment of wet mill waste water will reduce the bio-chemical load of coffee by up to 94% depending on system efficiency. The usual layout of 5 to 6 ponds is as follows:
First Stage Anaerobic Settlement Pond: Two ponds are designed as follows
Pipe bringing flow in from coffee processing at top
Rectangular beds are more efficient in reducing bio-chemical load
Site beds and ponds as far as possible from the coffee processing unit and away from housing.
Compact the base of the pond with a layer of argillaceous material
The capacity of the filtration bed should be twice the volume of one month’s processing water
Pond depth when full should be 1 – 2 m to aid evaporation.
Add lime to this first pond to improve correction of the output pH of water as it travels through the system
Outflow pipe at bottom corner.
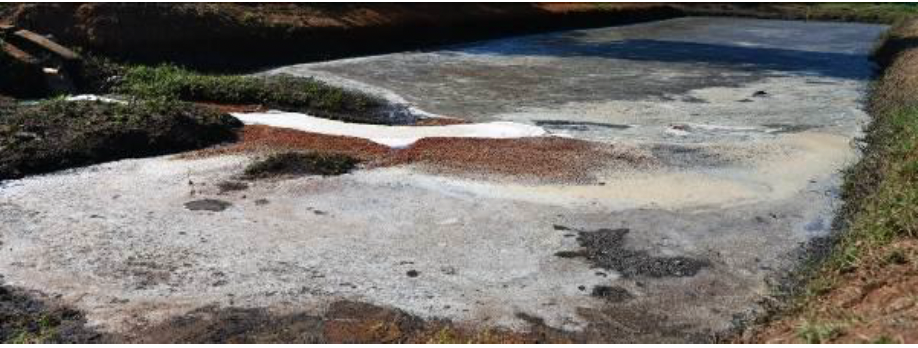
FIGURE 34: FIRST STAGE FILTRATION OF A POND
Second stage Filtration: A series of three or more secondary filtration ponds below the initial water treatment are necessary to clean the water further before release into the surrounding ecosystem. Design of these is the same as the anaerobic pond apart from the depth can be shallower at 0.5 - 1m.
Organic matter settles on the bottom of these ponds as sludge, and decomposes producing water, methane and carbonised gas.
Inflow pipe from anaerobic pond
Rectangular beds are more efficient in reducing bio-chemical load
Remove sludge on the bottom of ponds every 5 years
Solids from water filtering can be used as organic fertilizer
An overland flow facility can be built into the system in case of excess capacity
Outflow pipe to further filtration
Testing of water quality on an annual basis is recommended. Testing at the end of the harvesting and picking season will assess the maximum environmental impact of the wet mill on the local eco-system
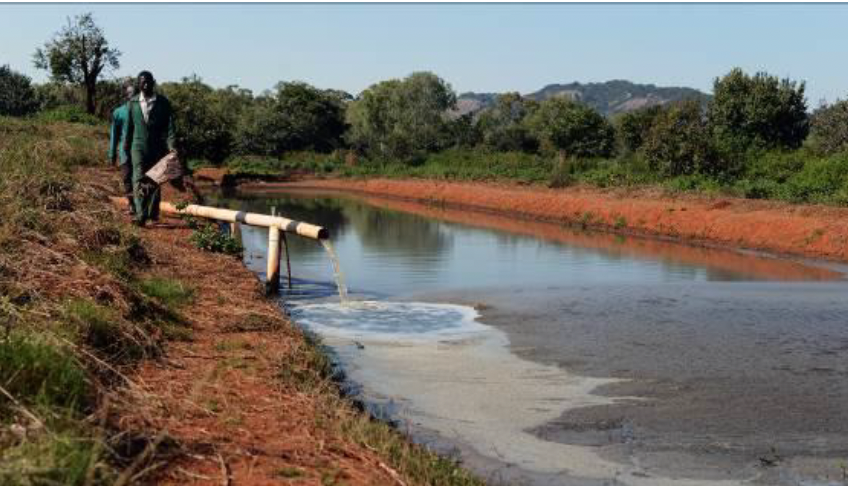
FIGURE 35: FINAL STAGE FILTRATION OF A POND
PULPED NATURAL OR ‘HONEY’ PROCESS
The pulped natural process was developed in Brazil and has spread in use to many parts of Latin America. In recent years it has also become commonly known as the honey process, especially within high value market segments of the coffee industry.
Traditional washed process coffee origins have adopted this method as a means of reducing overall water consumption, diversifying the product range of a wet mill, and as a method of accessing alternative market segments. Because the level of fructose and glucose are markedly different, sensory attributes of these coffees show a higher perceived sweetness when compared to traditional washed process coffees. Yields of red cherry to clean green coffee will also be higher for honey processed coffee because of the retained soluble solids.57
While it may seem a simple process when compared to the washed process, there are important technical challenges to address curing processing.
CONTROLLING THE PROCESS
Cherry selection is similar to that of the washed process and access to a floatation tank or washer separator is important to remove beans of low density and poor quality.
Producers can modify flavour and taste profile of the coffee if they use a mechanical mucilage removal pulper. This allows the producer to control the percentage of mucilage removed during processing and typically anywhere from 0% to 70% of the mucilage can be removed. This will markedly change cup profile and the decision to keep or remove mucilage is also linked to the availability of infrastructure needed to dry the coffee.
If water for pulping is recycled it is recommended that primary water is used instead for pulped natural coffee to prevent the risk of fermentation. This water can then be recycled.
Day one process flow of honey process coffee is:
Record the weight of cherry to be de-pulped.
Remove floaters.
De-pulp the coffee and pass to the drying bed.
Coffee should be levelled to a depth on one bean on a raised bed.
Mark drying beds with lot traceability information and the date when drying was started.
Coffee is left undisturbed for the first 16 hours.
Re-clean the coffee to remove skins, brokens and greens immediately after pulping.
If de-pulped coffee is levelled onto the raised bed by 2pm then three hours drying can take place before covering with non-tainting protective material to prevent rain or moisture forming on the coffee.
DRYING
The risk of developing dirty and fermented off taints in honey process is high due to the increased sugar content and sticky nature of the mass when compared to washed process coffee. Effective skin drying reduces the risk of these taints so the day following pulping is the most labour intensive and critical to process success. High quality raised beds are the most efficient medium for honey process coffees and the process flow is as follows:
Remove the protective covering from the coffee.
Mounding the coffee into 2-3 cm high rows and then immediately turn and flatten the mass to one bean depth every 15 minutes.
Ensure that coffee does not clump together as the mucilage dries onto the parchment.
Repeat this process until the coffee no longer clumps together (approx. 35% total moisture and after 4 – 5 hours).
Increase the drying depth to 2cm. This will take up approximately 35% of the initial raised bed space.
Turn the coffee every 15 – 20 minutes.After moisture content reaches 30% the drying mass can be thickened to facilitate optimum drying and prevent mass temperature rising too high.
During the hottest part of the day parchment should be piled into a ridge and covered. This prevents mass temperatures rising too high and promotes moisture equalisation through the coffee lot.
Drying mass should never exceed 3cm in depth when the coffee is drying from 25 to 12% total moisture.
Depending on the environmental conditions and drying curve the parchment will be golden coloured through to red.
The total drying time is usually between 10 – 12 days.
Once the total moisture reaches 12% the coffee can be weighed and stored.
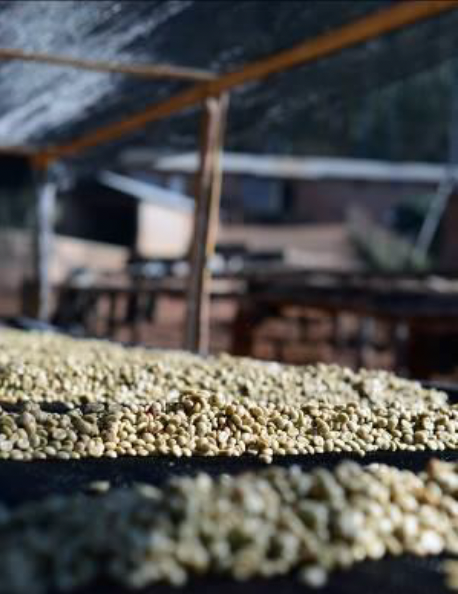
FIGURE 36: SKIN DRYING HONEY COFFEE UNDER SHADE
NATURAL PROCESS
CONTROLLING THE PROCESS
Critical to the success of the natural process is the separation of coffees in to similar levels of moisture content ripeness, and size. This is because coffee of the same size and moisture content will dry consistently and more uniformly, thus having the potential to produce quality coffee. Specifically perfectly ripe cherry has a total moisture content of 65% and over ripe to raisin coffee can have a moisture content as low as 35 %.
The first stage of natural process coffee is therefore to homogenise the cherry quality by:
Remove stones and foreign matter.
Remove raisins (nearly dry) and over ripe fruit – Keep these together.
Remove unripe fruit – keep together and pulp.
Remove small fruit.
This can be done with equipment such as a hydraulic separator or by hand sorting. Once initial sorting has been done coffee is passed directly to the drying table for final quality control and drying.
17.6.2. DRYING
Drying natural cherry follows similar principles to that of parchment coffee but drying times will be extended because of the larger size of whole coffee fruit compared to parchment, and the presence of the skin. The main lag in drying is during the first 1-3 days58.
The risk of fermentation is critical in the natural process. A period of three to four days stable dry weather is required for the natural process because extended drying times as a result of wet or humid conditions can increase the risk of fermentation. Covered green-house driers can also be used if weather patterns do not fit the ideal. Design of this type of drier should facilitate low humidity to prevent spoilage and prevent temperatures rising above 35°C for optimum quality59.
The Simple process flow for quality natural coffee is:
Record the weight of cherry.
Mark drying beds with lot traceability information and the date when drying was started.
Cherry should be levelled to a depth on one cherry on a raised bed.
Cherries are left undisturbed for the first 24 – 36 hours.
Once ripe cherry has been spread onto the raised bed it is then re-cleaned to remove any remaining cherries that are over ripe, under ripe, or split.
These are then processed separately or with grade B or C cherry depending on their quality.
If cherry is levelled onto the raised bed by 2pm then three hours drying can take place before covering with non-tainting protective material to prevent rain or moisture forming on the cherry.
After the initial 24 – 36 hours drying the coffee cherries should be turned once every 15-20 minutes.
After moisture content reaches 30% the drying mass can be thickened to facilitate optimum drying and prevent mass temperature rising too high.
During the hottest part of the day cherry should be piled into a ridge and covered. This prevents mass temperatures rising too high and promotes moisture equalisation through the coffee lot. If labour is available and conditions allow then stirring can help avoid the need to pile up the coffee and cover but at night the coffee must still be piled up and covered.
Drying mass should never exceed 5cm in depth when the coffee is drying from 25 to 12% total moisture.
The total drying time is usually between 14 – 21 days.
LAYING OUT RIPE CHERRY FOR NATURAL PROCESS
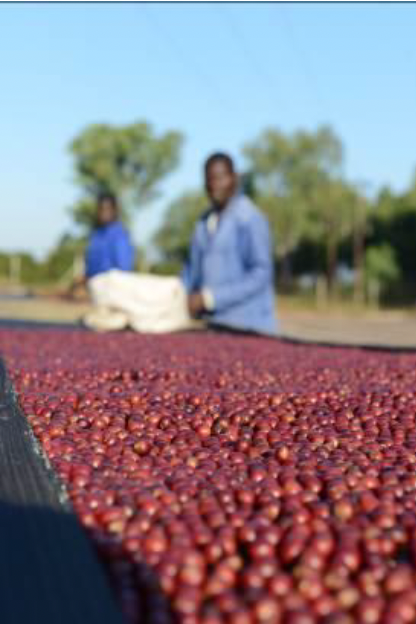
FIGURE 38: DRYING CHERRY ON DAY 15
DRYING MEDIUMS
Drying coffee is a critical factor in quality. At a basic level drying ensures that coffee remains sound and free from mould during storage. At a more detailed level the medium used for drying and way the drying takes place has an impact on quality.
Temperature and time are two key variables to monitor when drying coffee. As the coffee dries monitoring temperature becomes more important because the coffee becomes drier and more susceptible to temperature change.
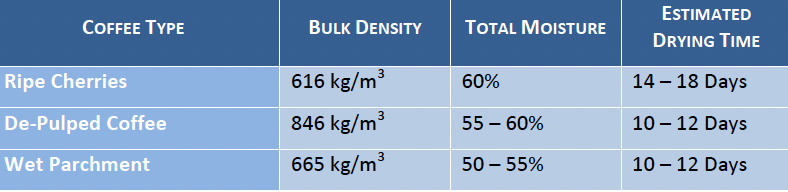
Drying capacity management at the wet mill facilitates effective process flow. Bulk densities, total moisture content, and drying time range for processed coffees prior to drying are as follows
DRYING TIME FOR PROCESSED COFFEES
RAISED BEDS
Raised beds traditionally were a method used throughout East Africa but are now being used globally because of quality driven results. This has led to several recommended design changes over recent years but the main variables of drying depth, air humidity, drying medium and partial shading remain central to success.
The basic quality management parameters for raised bed construction are:
Raised beds should be completely level and of a width of 1.5 – 2m.
Ideal height is approximately 1m.
A base of non-permeable HDPE (high-density polyethylene) materials allows for optimum airflow and is both taint free and long lasting.
Jute and Bamboo are not recommended as dying mediums because of the risk of off taints and improper drying
The supporting base material should be very taught and free from dips.
Completely flat structures with a 4cm lip at the sides and end are the most efficient in space management and bed depth homogeneity.
Elevated shading with non-permeable HDPE (high-density polyethylene) can be installed to regulate drying curves.

FIGURE 39: RAISED BED DESIGN and FIGURE 40: CLOSE UP OF RAISED BED
Daily routine is as follows:
Mark drying beds with lot traceability information and the date when drying was started.
Initial drying depth and pattern for the first 24 to 36 hours varies by process.
Optimum drying depth for quality of washed process coffees is 2 – 4cm61 depending on capacity issues.
2cm is preferred for control over high quality washed and honey process coffees.
Coffee should be turned with a hand rake every 15- 20 minutes to even the drying pattern.
Covering coffee between 11am -2pm regulates drying and improves cup profile.
Defects including brokens, greens and skins are easiest to remove during skin drying.
Any dips in the drying bed lead to inconsistent drying depths and poor quality.
Any coffee falling to the ground should be bulked with mbunis and off grades.
Avoid rewetting and cover the coffee with non-permeable material if it rains62.
At night coffee should be mounded into the centre of the bed and covered with non-permeable material to prevent moisture absorption and possible mould growth.
Coffee is ready to store once it reaches 12% total moisture.
Record the weight of parchment as it enters the store.
FIGURE 41: HAND RAKING PARCHMENT
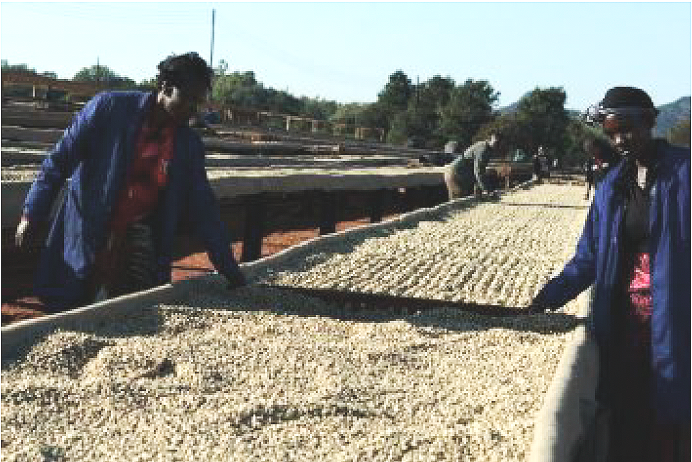
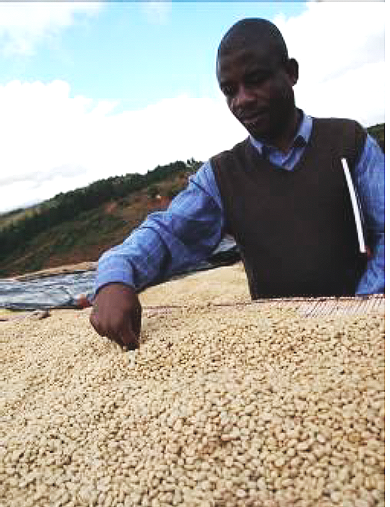
FIGURE 42: CHECKING COFFEE DRYING MASS DEPTH. THE COFFEE IN THE PHOTO IS TOO DEEPLY SPREAD
PATIOS
Patios provide a way of drying coffee with low energy cost and low maintenance need, but the initial construction cost is higher than raised beds and a large space is required. They should be built in a place that maximises sun and wind. Do not build them in shaded areas or low areas where temperature inversions may occur.
Different materials can be used but a critical factor is using an impervious surface. Common options are concrete or thin layer asphalt. Drying coffee directly on the ground is not recommended because it leads to mould formation and poor sensory attributes. Drying on tarpaulins laid on the ground is not recommended.
Preventing re-wetting is very important, particularly in the prevention of OTA63
Patios often have elevated temperatures compared to raised beds because the impervious surface absorbs heat through the day. However, the airflow is poorer and this must be taken into account when managing drying patterns. This means that during the early stage of drying for both parchment and natural process coffee the maximum depth is one bean. Deeper layering will extend the lag phase, risking mould growth and producing undesirable cup results.
Coffee drying on patios is managed by a worker walking with a rake backwards and forwards through the coffee, following their shadow to maintain straight lines. After the moisture has reduced to 30%, a regular process of increasing depth of the mass while raking takes place. This is as follows:
Parchment Coffee - 2cm on day 2 - 3cm on day 4
Whole cherries - 2cm cherries on day 3 - 3cm on day 5 - 5cm on day 7
As with other methods covering from heat of the day, regular turning at least once every 15-20 minutes, and moisture equalisation are important in order to dry coffee correctly. This results in a drying time for coffee within the following ranges:
Cup profile deteriorates significantly when depths increase beyond 4cm because drying is inconsistent. A simple way to check depth is by placing the index finger into the drying coffee mass. Optimum depth for quality of parchment is up to the first joint after the finger.
Natural Process: 15 – 20 days
Parchment Coffee: 10 – 12 days
Patios will also retain heat longer at night.
SOLAR DRYERS
Solar dryers are an advance in controlling the drying environment and can be used in conjunction with either patios or raised beds. If cold damp weather is a problem these are good solutions. Allow for natural process to be completed in environments where drying would be extended beyond 20 days, thus developing negative cups. Airflow control is critical and there must be a vent at either end or the roof. Temperature control and monitoring is recommended if possible and Greenhouse shading netting can be used to regulate temperature.
MECHANICAL DRYERS
A number of mechanical driers are used globally, and the most commonly used are rotary dryers. The design of these is a slow moving horizontal cylinder loaded with coffee that has warm air blown through the cylinder.
These dryers are useful for:
Fast and controlled pre-drying to 30°C.
Controlled finishing drying.
Periods of wet weather because they allow drying to continue.
Risks associated with these dryers are:
Drying coffee quickly at high temperatures impacts negatively on both initial cup profile and long term shelf life stability of green coffee.
The maximum temperature for the bean mass when producing speciality coffee is 40°C.
Coffee can tainted by smoke so the heat source must be controlled and non-direct
Airflow has to be managed.
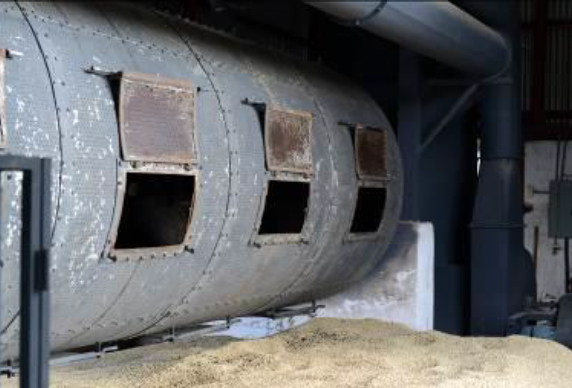
FIGURE 43: MECHANICAL ROTARY DRYER
PARABOLIC DRYERS
Parabolic dryers (sometimes called greenhouses) are a technology advance in controlling the drying environment and can be used in conjunction with either patios or raised beds. These dryers are a clear polythene surround with either a curved or triangular roof over the coffee.
If cold damp weather is a problem these are good solutions because drying is faster and re-wetting prevented. However, too fast drying is a major risk so airflow and temperature control is critical to success if parabolic dryers are used. Venting at either end of the dryer and the use of nursery shade netting during hot parts of the day can be used to regulate temperature in a simple way. For effective temperature control and humidity monitoring, data logging is recommended if possible.