3. Fermented Bed Technology (FBT)
3.4.3. Housing structure
In Fermented Bed Technology, pigs are intensively raised in a housing structure to: • Make management and feeding easy. Pigs of different sizes are raised separately, it is easier to quarantine sick animals when an outbreak of disease occurs. A farmer can also effectively manage pigs at different stages of growth such as breast feeding Sows, weaned piglets, finishers, porkers and breeding stock.
• Promote maximum production. While in a housed structure, the piglets are protected from the vagaries of nature. Fewer mortalities are experienced in a litter
• Control pests and prevent disease outbreaks. The inclusion of lime and salt (see section xxxxx) in the bedding material creates a sterile environment that prevents the growth of disease-causing organisms.
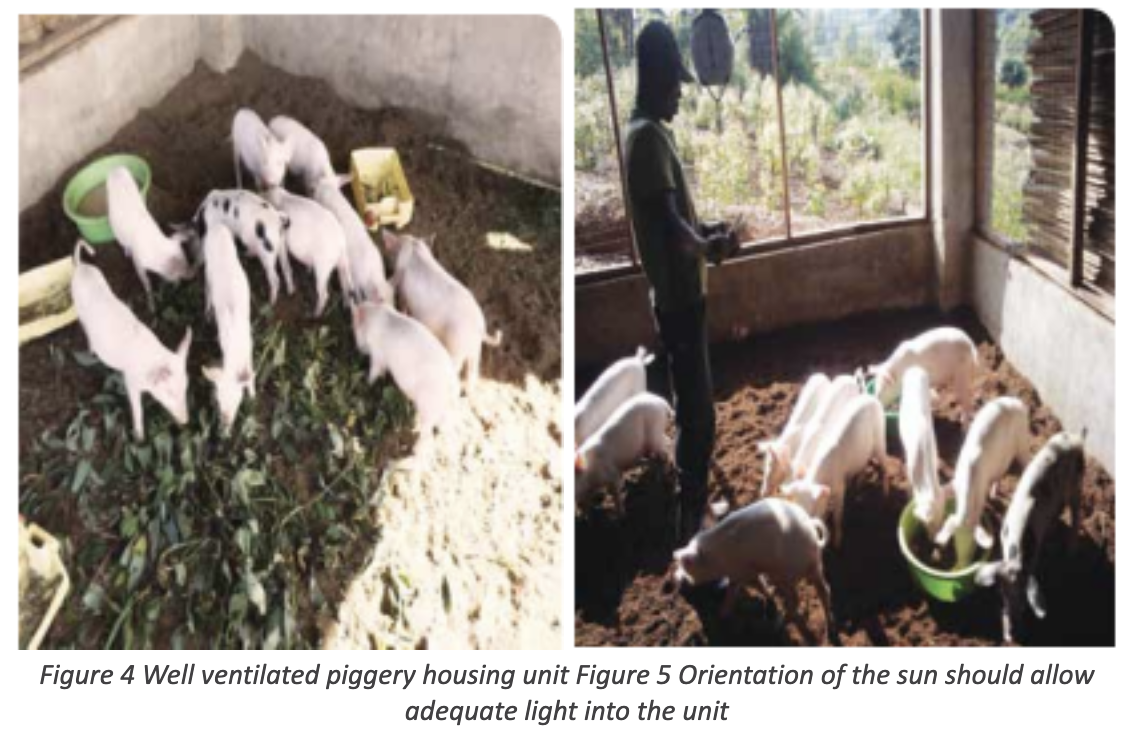
3.4.4. Factors to consider when selecting site for good housing
A good site
• Should drain well
• Its orientation should be in the east-west direction to allow sunlight to enter in the morning and evening
• It should have easy access points to deliver supplies using vehicles
• The roof should be made of material that protects pig from rain and direct sunlight
• The walls should allow for maximum air circulation
• It should have feed and water troughs
3.5. Components of a pig housing unit
3.5.1. The Roof
• It should be made from locally available materials such as dry thatching grass, polythene sheets, papyrus mats placed over polythene sheets, dry banana leaves placed over polythene sheet or iron sheets
• The roof should be at least three meters above the ground to create a cool environment • Be rain and sun proof
• Collect rainwater if corrugated iron sheets are used
• A minimum slope of 450 is recommended
3.5.2. Walls
• Use either bricks or timber off-cuts. The off-cuts should be nailed on the inside part of the house to prevent the pig from pushing against it easily
• The wall should be well plastered
• Use treated poles to support the structure
3.5.3. Floor
• The floor should not be cemented but left bare with a soil surface
• It should be covered by parent material of dry matter ( grass, maize stalk, sorghum straws, twigs or small branches)
• The parent material should be covered by a mixture of either fine saw dust or rice/wheat bran mixed with lime, table salt, red soil.
• The material is then maintained by sprinkling a solution containing Indigenous Micro Organisms (IMOs)
3.5.4. Space requirements
The amount of space will depend on:
⮚ Size of the animals. A housing unit should have pigs of the same size.
⮚ Age of animal
⮚ Physiological condition (lactating Sows, pregnant Sows)
⮚ The housing unit should not be overcrowded as this will lead to:
Discomfort
⮚ Increased susceptibility to disease
⮚ Poor weight gain
⮚ Increased cases of fighting and tail biting
⮚
Recommended number of animals in a 16m2 housing unit is shown in Table 3.
Dry Sows should be housed in groups. Boars are kept in individual pens to eliminate fighting, riding and competition for feed. Boars kept separately live longer. Boar pens should be close to recently weaned pig Sow pens. This promotes fast return to heat.
Each lactating Sow should be kept in a separate pen. There should be a creep area for the piglets; the piglets can run to this area to avoid being crashed by the Sow as it lies down.
Table 3: Recommended number of animals in a 16m2 housing unit
Stage of growth: Boars
No. of animals/16m2: 1
Stage of growth: Gilts
No. of animals/16m2: 10
Stage of growth: Sows
No. of animals/16m2: 10
Stage of growth: Lactating Sows
No. of animals/16m2: 5
Stage of growth: Weaners
No. of animals/16m2: 20-30
Stage of growth: Growers
No. of animals/16m2: 15-20
3.5.5. Feed and water troughs
▪ The feed and water troughs should be placed on opposite sides so that the pigs can exercise as they move from one trough to another
▪ The water troughs should be shifted regularly to avoid over wetting the same spot ▪ It is advisable to use plastic troughs since these can be easily washed to maintain an acceptable level of hygiene
▪ The troughs do not necessarily have to be fixed, they should be easily moved to create more room for exercise after the animals have fed and drunk water.
▪ If the troughs are fixed, they should be built along the wall
▪ Each pig should be allowed a space of 30cm in a feed trough
▪ The water trough should be at least 30cm in height.
3.6. Construction of an fbt house
3.6.1. Site selection.
Under the guidance of a project staff, an extension officer, or an animal production specialist, the farmer should identify a suitable site to construct the pig house. The site should be free of shade; have adequate air circulation and good drainage. Locate a suitable site, measure the dimensions of the structure and guide the farmer and his team in excavation, building and roofing of the structure. The Figure 7 illustrates how this was done by members of the Kyabutaika Innovations Platform, Nakasongola district.

3.6.2. Setting and building up the pig house.
To construct the housing structure measure: length 4m and 4m width of the ground structure. Excavate the 16m2 to a depth of 100cm. Build up the walls of the excavated pit using bricks up to 100cm with corner columns raised to a height of 200cm above the ground. Construct the roof with a pitch of 75cm and build it with roofing materials: grass thatched or iron sheets or any water proof material. If possible the brickworks should be cement plastered to increase the durability of the wall (Fig. 8).

The specific steps to take are:
1. Site clearing. Clear the area of all grass, bushes or shrubs. This eases the process of taking measurements, excavating and deliver of materials to site (Fig.7)
2. Demarcating floor area. With the guidance of a mason, demarcate an area of at least 4.5m x 4.5m. The internal diameter after plastering should be 4m x 4m
3. Excavation works. Using hoes, pike axes and shovels, remove the soil within the demarcated area up to a depth of 1m (100cm). The edges of the pit should be straight and even
4. Construction of wall.
1. Raise a wall using mortar of 1:4 (cement: sand) mix and clay bricks arranged head to head
2. Raise the bricks up three courses above the ground
3. Raise corner pillars up to 2m (200cm) above the ground
4. The corner pillars should be strong enough to support the roof
5. Plaster the bricks to a smooth finish.
Alternatively,
1. Dig holes up to a depth of 50cm in each corner and place wooden posts
2. The wooden post should be 3.5m (350cm) tall, straight and as smooth as possible.
3. Then nail wooden off-cuts on the inside part of the wall from the bottom of the pit up to one foot above ground level
4. The off-cuts should be as close as possible to prevent the pigs from farrowing into the soil behind the off-cuts
5. Avoid protruding nails as they will injure the pigs or workers/farmers.

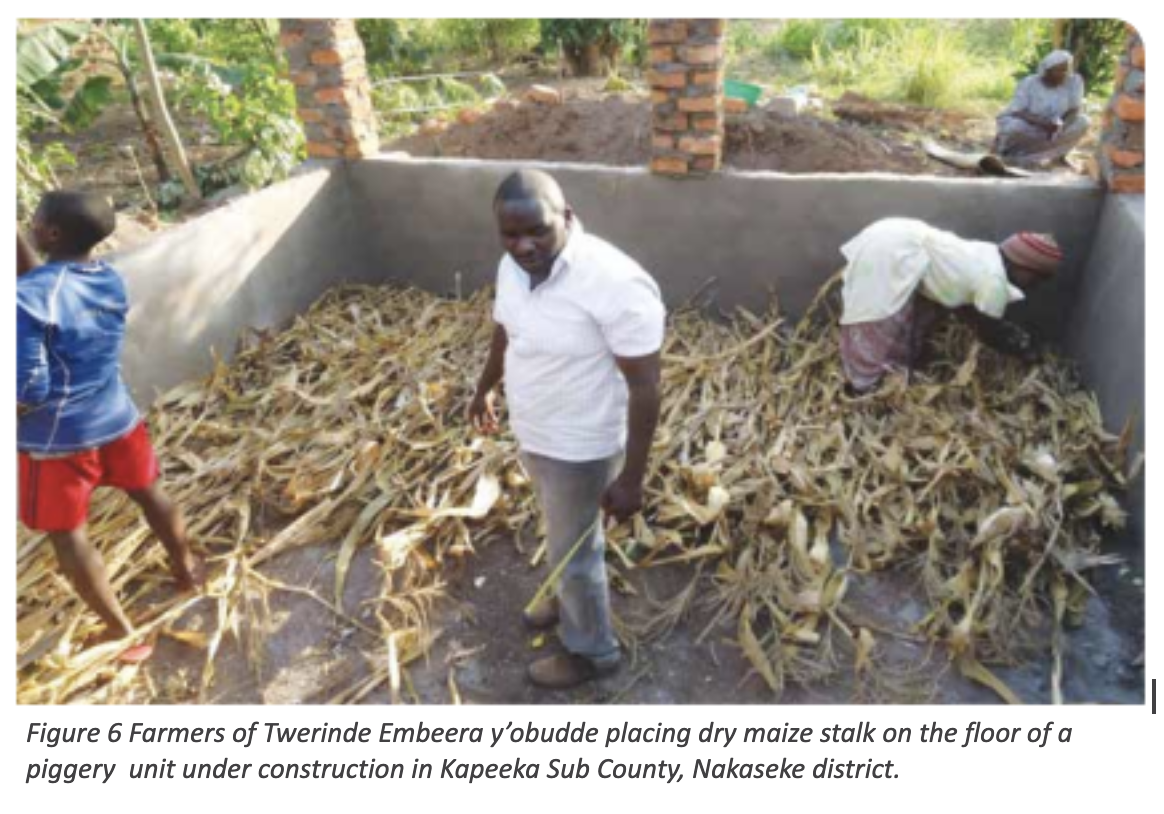
3.6.3. Introduction of bedding material and fermentation.
Bedding material consists of dry grass, maize or rice straws or small tree branches laid firmly on the floor. A majority of the houses use dry maize stocks as bedding material since maize is the most commonly grown crop by the community. The bedding materials are placed in the pit up to a depth of 30cm. This is immediately overlaid by another 40cm of fine sawdust (65 bags) or rice husks mixed with loam soil (100kgs or 3 wheel burrows), lime (10kgs), and table salt (10kgs) (Fig 10) and moistened using water having Indigenous Micro Organisms (IMO) to start the fermentation process. The procedure for preparing the IMO is outlined in Text Box 2.
The steps to follow are:
1. Place either dry grass, maize stalk, rice straws or small branches on the floor up to a height of 30cm.
2. Immediately after maize stalk or small tree branches are placed on the floor, bedding materials are put up to a height of 40cm.
3. This bedding material consists of fine sawdust (70 bags), 100Kgs of loam soil (or 3 wheelbarrows), lime (10kgs), and table salt (10kgs).
3.6.4. Preparing IMO and inoculating the bed.
To prepare a solution of the IMO, and use it to ferment the bed, follow the steps outlined in Text Box 2. Micro-organisms decompose and convert complex organic materials such as dead plants and animals tissues, excreta and other organic materials into simple organic compounds such as organic manure, antibiotic substances, enzymes, and lactic acids, which suppress diseases and worms and promote environmental hygiene - no smell, no flies, no run-off

Step1: Purchase 1 Kg of solid IMO from a pig farmer already using the organic/IMO system of pig rearing
Step 2. A plastic drum of 200 liter capacity is filled with 10 jerry cans of clean water. Each jerry can has a capacity of 20 liters. Place the drum in a cool place protected from rain and direct sun rays since microorganisms do not grow well when put under direct sunlight.
Step 3. Add solid IMO into the plastic drum; 2 table spoons per 20 liter jerrycan; without dipping the table spoon in the drum. This is to avoid contaminating the remaining solid IMO in its original container. Total of 20 table spoons are placed in the drum.
Step 4. Five Kilograms of pure maize bran are weighed and added to the drum. In the absence of a weighing scale, to use hands/palms. Two full palms per 20 liter jerry can be added into the drum. In total, 40 handfuls are added into the drum. The maize bran acts as the food for the microorganisms. Cover the drum with a mosquito net to avoid contamination and insects falling in. The liquid is ready for use 24 hours later .
Step 5. Liquid IMO is sprinkled on the litter and thereafter mixed using a combination of hoes and garden forks. Only the first 30cm of the litter is mixed with liquid IMO until a moisture content of 60% is achieved. This is achieved by sprinkling an initial 150 liters of liquid IMO.
Step 6. Starter culture. The balance of 50 liters remaining in the plastic drum is used to culture more liquid IMO following the steps explained above. The liquid IMO in the drum should not exceed six days before preparing new liquid IMO.